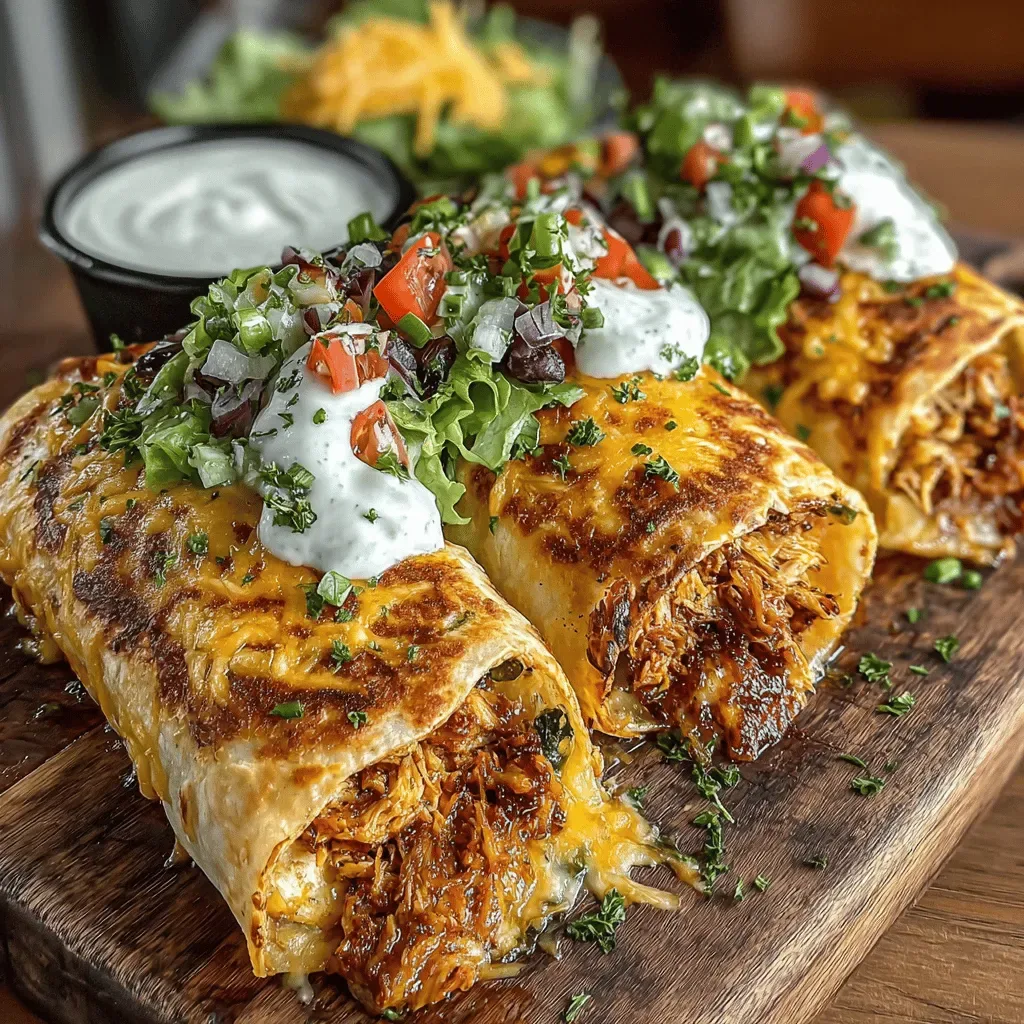
Imagine biting into a warm tortilla that delivers the smoky heat of Hatch chilies, the cool creaminess of ranch, and the comforting heartiness of chicken—all in one handheld masterpiece. This breakfast‑brunch hybrid is the perfect way to start a lazy weekend or impress guests at a casual brunch gathering.
What makes these wraps truly special is the marriage of fresh Hatch chilies with a tangy ranch‑infused sauce, creating a bright, slightly spicy flavor that never overwhelms. The chicken stays juicy thanks to a quick sear, while the veggies add crunch and color.
Busy parents, brunch lovers, and anyone who craves a handheld breakfast will adore this dish. Serve it for a relaxed morning buffet, a midday pick‑me‑up, or even as a light dinner paired with a simple salad.
The process is straightforward: season and sear the chicken, whisk together a quick Chili Ranch sauce, toss everything with crisp veggies, then roll it all up in a soft tortilla. In under forty minutes you’ll have a vibrant, satisfying wrap ready to eat.
Why You'll Love This Recipe
Bold, Balanced Flavor: Hatch chilies deliver authentic heat while the ranch component adds a cool, buttery note, creating a perfect sweet‑heat balance that keeps you reaching for more.
Quick Week‑Day Solution: With just 15 minutes of prep and 25 minutes of cooking, this recipe fits neatly into a busy morning schedule without sacrificing taste or nutrition.
Hand‑Held Convenience: Wrapped in a soft tortilla, the dish is easy to eat on the go, making it ideal for brunch buffets, picnics, or a portable breakfast.
Customizable Canvas: Swap proteins, adjust spice levels, or add extra veggies—each variation stays delicious, allowing you to tailor the wrap to any palate or dietary need.
Ingredients
The foundation of this wrap is fresh, high‑quality chicken paired with bright Hatch chilies and a creamy ranch base. The tortillas provide a neutral canvas, while the crunchy vegetables add texture and a burst of freshness. Together, these components create a harmonious blend of heat, creaminess, and crispness that defines the dish.
Main Ingredients
- 4 boneless, skinless chicken breasts (about 1½ lbs)
- 1 cup diced Hatch green chilies (fresh or canned, seeds removed)
- 8 large flour tortillas (10‑inch)
Chili Ranch Marinade
- ½ cup ranch dressing (store‑bought or homemade)
- 2 tablespoons olive oil
- 1 tablespoon honey
Vegetables & Garnish
- 1 cup shredded red cabbage
- ½ cup diced red bell pepper
- ¼ cup chopped fresh cilantro
Seasonings & Final Touch
- 1 teaspoon smoked paprika
- ½ teaspoon garlic powder
- Salt and freshly ground black pepper, to taste
The ranch dressing provides a creamy backbone that mellows the chilies, while honey adds a subtle sweetness that balances the heat. Smoked paprika and garlic powder deepen the flavor profile, giving the chicken a smoky, aromatic edge. Fresh cilantro and crisp cabbage bring a bright, refreshing finish that keeps each bite lively and satisfying.
Step-by-Step Instructions
Preparing the Chicken
Pat the chicken breasts dry with paper towels, then slice each breast horizontally into two thin cutlets. This creates a surface that sears quickly and absorbs the Chili Ranch marinade more efficiently. Season both sides with salt, pepper, smoked paprika, and garlic powder. Let the seasoned chicken rest for 5 minutes while you heat the pan.
Making the Chili Ranch Sauce
- Combine sauce ingredients. In a medium bowl whisk together the ranch dressing, honey, diced Hatch chilies, and olive oil until smooth. The honey helps the sauce cling to the chicken while adding a gentle glaze.
- Heat the skillet. Place a large skillet over medium‑high heat for 3 minutes. Add a drizzle of olive oil; when it shimmers, you’re ready to sear.
- Sear the chicken. Lay the cutlets in a single layer, being careful not to overcrowd. Cook 3‑4 minutes per side until golden brown and just cooked through. Transfer to a plate and keep warm.
- Deglaze with sauce. Reduce heat to medium, pour the Chili Ranch mixture into the pan, and stir, scraping up any browned bits. Simmer for 2‑3 minutes until the sauce thickens slightly, coating the pan.
- Coat the chicken. Return the seared chicken to the skillet, turning to coat each piece in the glossy sauce. Cook an additional minute so the flavors meld.
Assembling the Wraps
Warm each tortilla in a dry skillet for 15 seconds per side; this prevents tearing and makes the wrap pliable. Lay a tortilla flat, spoon a generous amount of the Chili Ranch‑coated chicken onto the center, then top with shredded cabbage, diced bell pepper, and a scattering of fresh cilantro. Drizzle any remaining sauce over the veggies.
Cooking the Wraps
Fold the sides of the tortilla inward, then roll tightly from the bottom up, sealing the edge with a light press. Return the rolled wraps to the skillet, seam side down, and toast for 2‑3 minutes per side until the exterior is lightly browned and the interior is heated through. Slice diagonally and serve immediately.
Tips & Tricks
Perfecting the Recipe
Thin the chicken. Cutting each breast in half horizontally creates thinner cutlets that cook evenly and absorb more sauce.
Rest after searing. Allow the chicken to sit for a minute before adding the sauce; this prevents steam from diluting the glaze.
Use fresh Hatch chilies. When in season, fresh chilies give a brighter heat and more complex flavor than canned varieties.
Warm tortillas. A quick heat on a dry pan makes them flexible, reducing the risk of tearing during rolling.
Flavor Enhancements
Finish each wrap with a squeeze of fresh lime juice for bright acidity, or sprinkle a pinch of toasted cumin seeds for earthy depth. A drizzle of extra ranch or a spoonful of avocado crema adds luxurious richness without overpowering the chilies.
Common Mistakes to Avoid
Avoid overcrowding the skillet; it causes steaming rather than a proper sear. Also, don’t skip the brief sauce reduction—without it the wrap can become soggy, losing its crisp texture.
Pro Tips
Invest in a meat thermometer. Aim for an internal temperature of 165°F (74°C) for perfectly cooked chicken every time.
Prep all fillings first. Having vegetables, sauce, and chicken ready speeds up assembly and keeps the cooking flow smooth.
Use a cast‑iron pan. It retains heat well, giving the tortilla a beautiful, even golden crust.
Store extra sauce separately. This prevents the wrap from becoming soggy if you’re preparing ahead of time.
Variations
Ingredient Swaps
Replace chicken with sliced pork tenderloin, shrimp, or firm tofu for a different protein profile. Swap the red cabbage for thinly sliced radishes or pickled carrots to change texture. If you prefer milder heat, use roasted poblano peppers instead of Hatch chilies.
Dietary Adjustments
For a gluten‑free version, choose corn tortillas and verify that the ranch dressing is free of wheat‑based thickeners. Make the dish dairy‑free by swapping ranch for a cashew‑based dressing. Keto diners can use low‑carb tortillas or lettuce leaves as wraps and substitute honey with a sugar‑free sweetener.
Serving Suggestions
Pair the wraps with a side of cilantro‑lime quinoa, a light cucumber‑mint salad, or a bowl of black bean salsa. A dollop of guacamole or a drizzle of chipotle mayo adds an extra layer of richness for those who love bold toppings.
Storage Info
Leftover Storage
Allow the wraps to cool to room temperature, then separate the sauce from the tortillas if possible. Store the chicken and vegetables in an airtight container in the refrigerator for up to 3 days. Keep tortillas wrapped in foil or a zip‑top bag to stay soft.
Reheating Instructions
Reheat chicken and veggies in a skillet over medium heat, adding a splash of water or broth to prevent drying. Warm tortillas in a dry pan for 30 seconds per side, then reassemble. For a faster option, microwave the filling for 1‑2 minutes, then briefly toast the tortilla.
Frequently Asked Questions
This Hatch Chili Ranch Chicken Wrap brings together smoky heat, creamy ranch, and crisp veggies in a convenient, handheld package perfect for breakfast or brunch. By following the step‑by‑step guide, using the tips provided, and experimenting with the suggested variations, you’ll create a dish that’s both satisfying and endlessly adaptable. Feel free to tweak the ingredients, spice level, or toppings to suit your taste—cooking is all about personal expression. Enjoy every bite of this vibrant, flavorful wrap!