
Frozen Banana Snickers Bites Recipe: A Deliciously Healthy Treat
Are you looking for a dessert that satisfies your sweet tooth while remaining on the healthier side? Look no further than Frozen Banana Snickers Bites. This delightful treat combines the familiar flavors of chocolate, peanut butter, and banana, creating a decadent yet nutritious snack that everyone can enjoy. With the perfect balance of creamy, crunchy, and sweet elements, these bites are not only delicious but also simple to make at home.
The appeal of Frozen Banana Snickers Bites lies in their versatility. They are an excellent option for a guilt-free dessert, a post-workout snack, or even a fun treat for kids. The natural sweetness of ripe bananas, paired with the rich flavor of creamy peanut butter and the satisfying crunch of crushed peanuts, creates a harmony of textures that is hard to resist. Plus, the ease of preparation makes this recipe an attractive choice for anyone looking to whip up something special without spending hours in the kitchen.
Understanding the Ingredients
To create the perfect Frozen Banana Snickers Bites, it’s important to understand the role of each ingredient and how they contribute to the overall flavor and texture of the treat.
Ripe Bananas: At the base of this recipe are ripe bananas, which provide both sweetness and a creamy texture. Nutritionally, bananas are a powerhouse, packed with essential vitamins and minerals such as potassium, vitamin C, and vitamin B6. Their natural sugars not only enhance the flavor but also make them a healthier alternative to processed sweets.
Creamy Peanut Butter: This ingredient is the heart of the Snickers-inspired flavor profile. Creamy peanut butter adds richness and depth, while also providing a dose of healthy fats and protein. The combination of protein and fat helps keep you feeling full longer, making these bites a satisfying snack. When selecting peanut butter, opt for a natural variety without added sugars or hydrogenated oils for the healthiest option.
Honey vs. Maple Syrup: Both honey and maple syrup serve as sweeteners in this recipe, but they bring distinct flavors to the table. Honey offers a floral sweetness with a hint of earthiness, while maple syrup has a more robust, caramel-like flavor. When considering dietary restrictions, honey may not be suitable for vegans, while maple syrup is plant-based. Choose the sweetener that best fits your dietary needs and personal taste preferences.
Unsweetened Cocoa Powder: To achieve that rich chocolate flavor reminiscent of traditional Snickers bars, unsweetened cocoa powder is essential. It allows you to control the sweetness of your dessert while still delivering that deep cocoa taste. Plus, cocoa powder is packed with antioxidants, making it a healthier addition to your treat.
Crushed Peanuts: The addition of crushed peanuts not only enhances the flavor but also adds a satisfying crunch to each bite. When selecting peanuts for this recipe, you can choose between salted and unsalted varieties. Salted peanuts bring an extra layer of flavor, while unsalted peanuts allow the natural sweetness of the other ingredients to shine.
Dark Chocolate Chips: For the final coating, dark chocolate chips are the perfect finishing touch. Dark chocolate offers a more intense flavor compared to milk chocolate and is rich in antioxidants. If you’re looking for a healthier option, you can also consider using sugar-free chocolate chips or a dairy-free variety if you have dietary restrictions.
Step-by-Step Instructions for Frozen Banana Snickers Bites
Now that we’ve covered the ingredients, let’s dive into the step-by-step process for creating these delightful Frozen Banana Snickers Bites.
Preparing the Bananas
The first step in making Frozen Banana Snickers Bites is selecting the right bananas. Ripe bananas are key to achieving the perfect sweetness and creamy texture. Look for bananas that are mostly yellow with a few brown spots, as they will be the sweetest. Overripe bananas can also work, but be cautious of using ones that are too mushy, as they may not hold up well during the freezing process.
Once you have your ripe bananas, the next step is to slice them. Aim for uniform slices, approximately half an inch thick. This thickness will allow for easy assembly and a balanced ratio of banana to peanut butter. Arrange the banana slices on a baking sheet lined with parchment paper, ensuring they are not touching each other. This arrangement will prevent them from sticking together during the freezing process.
Making the Caramel Mixture
Next, it’s time to create the creamy caramel-like filling. In a mixing bowl, combine the creamy peanut butter with your chosen sweetener—honey or maple syrup. The ratio is typically about 1 part sweetener to 2 parts peanut butter, but feel free to adjust according to your taste preference.
Using a fork or a small whisk, blend the ingredients until you achieve a smooth and creamy consistency. The goal is to create a mixture that is thick enough to hold its shape but still spreadable. This mixture mimics the traditional caramel found in Snickers bars, giving your bites that signature flavor without the added sugars and artificial ingredients.
Assembling the Bites
With the banana slices and caramel mixture ready, it’s time to assemble your Frozen Banana Snickers Bites. Take one banana slice and spread a generous amount of the peanut butter mixture on top. Aim for about a teaspoon of the mixture per slice, making sure to cover each slice evenly for a balanced flavor throughout the bite.
Once you’ve added the peanut butter mixture to half of your banana slices, take another slice and place it on top to create a sandwich. Gently press down to ensure the slices stick together. Repeat this process until all banana slices are used, creating a delightful assembly of banana and peanut butter sandwiches.
Coating with Cocoa
The final step before freezing is to coat the assembled banana bites with unsweetened cocoa powder. This step is crucial as it adds an extra layer of chocolate flavor and helps to keep the bites from becoming too icy during the freezing process. Simply place a few tablespoons of cocoa powder in a shallow bowl and roll each banana sandwich in the cocoa until fully coated.
Once coated, return the bites to the baking sheet and place them in the freezer. Allow them to freeze for at least two hours or until they are firm. This freezing process ensures that the bites hold their shape when you’re ready to enjoy them.
With these steps completed, you’ve laid the groundwork for a deliciously healthy dessert that captures the essence of a Snickers bar without the guilt. Stay tuned for the next part of this article, where we’ll explore variations and serving suggestions to elevate your Frozen Banana Snickers Bites experience even further.
{{image_2}}
Techniques for Ensuring Even Coverage
To ensure that each banana piece is evenly coated in chocolate, it is essential to follow a systematic approach during the dunking process. Start by preparing your workspace: lay out a baking sheet lined with parchment paper to prevent sticking. This will also make cleanup easier. Dip each frozen banana slice into the melted chocolate, ensuring that it is fully submerged. Use a fork or a dipping tool to lift the banana out of the chocolate, allowing any excess to drip back into the bowl. This technique helps maintain an even layer of chocolate coating, essential for both appearance and taste.
Additionally, consider using a toothpick or skewer to hold the banana slice while dipping. This not only keeps your fingers clean but also allows for better control when coating the banana bites. After dipping, place the banana on the parchment-lined baking sheet, making sure they are spaced out to prevent sticking during the freezing process.
Freezing Process
The freezing process is crucial for the texture of the Frozen Banana Snickers Bites. Once the banana bites are coated in chocolate, they should be returned to the freezer immediately. This helps to solidify the chocolate coating quickly and ensures that the bananas remain firm and creamy.
It’s important to freeze the bites for at least 1-2 hours, or until the chocolate is completely hardened. If you plan on making these bites ahead of time, they can be stored in an airtight container in the freezer for up to a month. This makes them a convenient and delicious treat to have on hand for unexpected cravings.
Importance of Freezing for Texture and Preparation of the Chocolate Coating
Freezing the banana bites serves two main purposes: it helps maintain the integrity of the banana and creates the perfect texture for the chocolate coating. When frozen, bananas develop a creamy consistency, which complements the rich chocolate layer. If the bananas are not fully frozen, the moisture can cause the chocolate to seize or become too soft, resulting in a less appealing texture.
Time Management Tips for a Smooth Workflow
Efficient time management in the kitchen can significantly enhance your baking experience. Here are some tips to streamline your workflow while making Frozen Banana Snickers Bites:
1. Prep Ahead: Slice the bananas and freeze them in advance. Doing this the night before allows you to skip this step when you’re ready to make the bites.
2. Melt Chocolate While Bananas Freeze: Use the time while your banana slices are freezing to melt your chocolate. This will save you time and ensure everything is ready to go when you begin dipping.
3. Create an Assembly Line: Set up your workspace in an organized manner. Have your frozen bananas, melted chocolate, and toppings all within reach to facilitate a smooth coating process.
Melting the Chocolate
Safe Melting Methods and Troubleshooting Common Issues
There are two primary methods for melting chocolate: the microwave and the double boiler. Both methods can yield great results if done correctly.
Microwave Method:
1. Place your chocolate in a microwave-safe bowl.
2. Heat in 30-second intervals, stirring between each interval until smooth. Be careful not to overheat, as chocolate can seize quickly.
Double Boiler Method:
1. Fill a pot with water and bring it to a gentle simmer.
2. Place a heatproof bowl over the pot, ensuring it doesn’t touch the water.
3. Add your chocolate to the bowl, stirring until melted.
If your chocolate seizes or becomes grainy, it’s often due to moisture. To troubleshoot, you can add a teaspoon of vegetable oil or coconut oil to help smooth it out.
Dunking and Coating the Bites
Best Practices for Achieving a Smooth Chocolate Coating
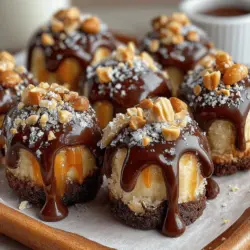
When dunking the banana slices, aim for complete coverage but avoid over-coating. A thin layer is ideal, as it hardens better and provides a delightful crunch without overwhelming the banana flavor. After dunking, gently tap the fork against the bowl to remove excess chocolate before placing the coated banana on the parchment paper.
Importance of Timing When Adding Crushed Peanuts
If you’re including crushed peanuts as a topping, timing is key. Sprinkle the crushed peanuts onto the chocolate coating while it is still wet; this ensures they stick properly. Waiting too long can result in the peanuts falling off when the chocolate hardens.
Final Freeze and Serving Suggestions
Why a Final Freeze is Crucial for Presentation and Texture
After all banana bites have been coated and garnished, a final freeze is critical. This step solidifies the toppings and the chocolate layer, ensuring that the bites maintain their shape when served. Freeze them for an additional 30 minutes to 1 hour before serving for the best results.
Creative Serving Ideas
Frozen Banana Snickers Bites can be served in various creative ways. Consider using decorative bowls filled with fresh fruit, such as berries or sliced apples, which can complement the flavors of the bites. You can also arrange the bites on a platter, garnished with a drizzle of melted chocolate or a sprinkle of sea salt for an elegant touch. Presenting them with a dollop of whipped cream or yogurt can enhance the experience, making it a delightful treat for any occasion.
Nutritional Benefits of Frozen Banana Snickers Bites
Frozen Banana Snickers Bites not only satisfy sweet cravings but also offer numerous health benefits thanks to their wholesome ingredients.
Analysis of the Health Benefits of Key Ingredients
Bananas: Rich in potassium, bananas are essential for heart health and maintaining healthy blood pressure levels. They are also a good source of vitamins C and B6, which support immune function and metabolism.
Peanut Butter: This ingredient is packed with protein and healthy fats, making it a great energy source. Peanut butter also contains essential nutrients such as vitamin E, magnesium, and niacin, which contribute to overall wellness.
Dark Chocolate: Known for its antioxidant properties, dark chocolate can improve heart health and lower blood pressure. It also contains flavonoids, which have been linked to improved brain function.
Variations and Customizations
Frozen Banana Snickers Bites are highly customizable, allowing you to cater to different dietary needs and flavor preferences.
Ideas for Altering the Recipe to Fit Different Dietary Needs
– Vegan: Substitute regular chocolate with dairy-free chocolate and use almond or sunflower seed butter instead of peanut butter.
– Nut-Free: Opt for seed butter like sunflower seed butter as a replacement for peanut butter.
Flavor Variations
Experiment with adding spices such as cinnamon or nutmeg to the peanut butter for a warm twist. You can also swap out the peanut butter for other nut butters like almond or cashew for a different flavor profile.
Creative Toppings to Enhance Visual Appeal and Flavor
Consider adding toppings like shredded coconut, mini chocolate chips, or a drizzle of caramel sauce to elevate the flavor and visual appeal of your Frozen Banana Snickers Bites. These additions can create a fun and indulgent twist on the classic recipe.
Conclusion
Making Frozen Banana Snickers Bites is not only a fun and creative kitchen project but also a healthy way to satisfy your sweet tooth. With their delightful combination of flavors and textures, these bites offer a guilt-free dessert option that you can enjoy anytime.
Don’t be afraid to experiment with the recipe and make it your own. Whether you try different nut butters, toppings, or even add a bit of spice, the possibilities are endless! Enjoy the process of creating these delicious treats, knowing that you’re indulging in a dessert that is as nutritious as it is satisfying. Happy snacking!