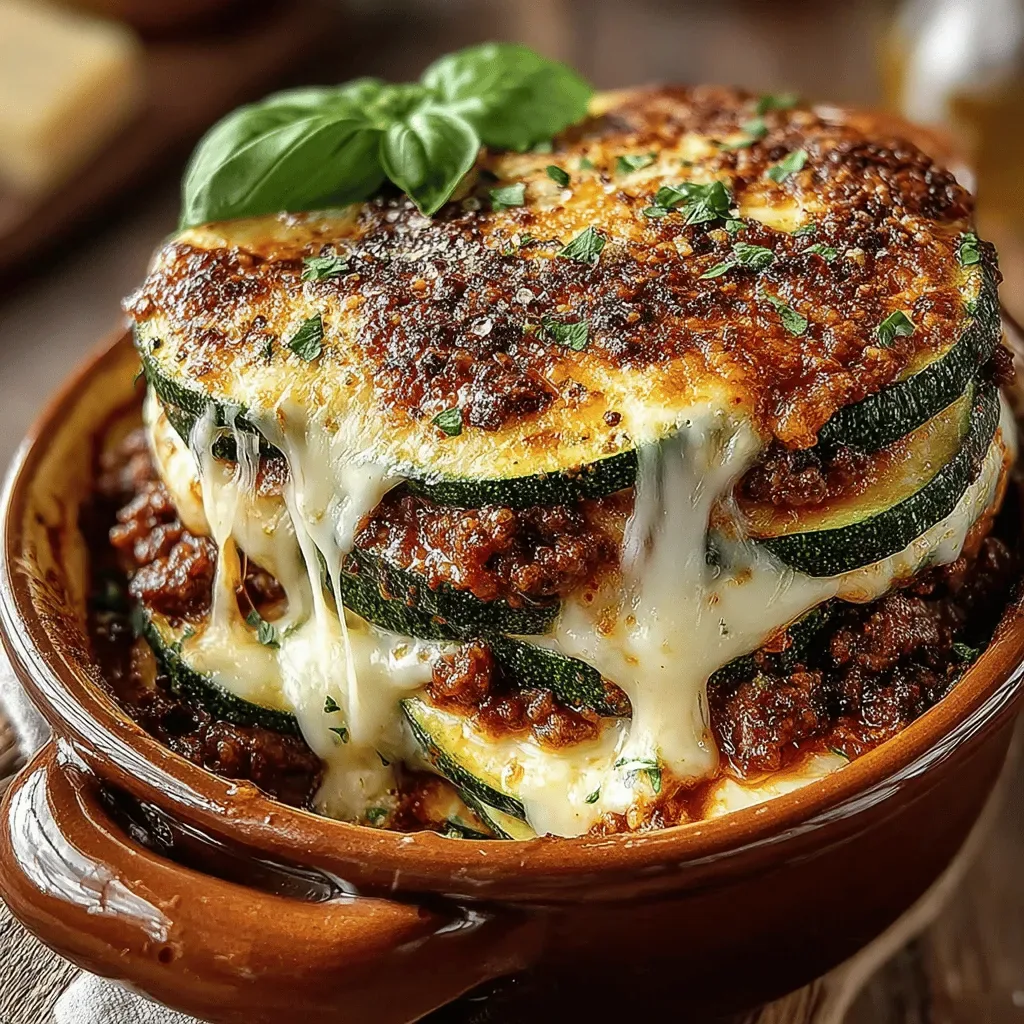
It was a chilly Saturday night, the kind where the wind whistles through the cracked windows and the house feels a little too quiet. I was rummaging through the freezer, half‑heartedly scrolling through my phone for dinner ideas, when a sudden craving hit me like a bolt of lightning: golden, crispy fries smothered in molten cheese, speckled with smoky bacon, and crowned with a cool dollop of sour cream. The moment I pulled the bag of thick‑cut frozen fries from the freezer, a faint scent of potato and oil rose, promising comfort in every bite. As the oven preheated, the kitchen filled with that familiar, buttery aroma that always makes my stomach rumble, and I realized that this was more than a snack—it was a memory in the making.
I still remember the first time my teenage son begged for “the ultimate fries” after a long soccer practice. I tossed the fries on a sheet pan, drizzled them with olive oil, and baked them until they sang a crisp, golden chorus. Then came the cheese—sharp cheddar shredded just before it hit the hot fries, melting into glossy rivers that clung to every crevice. A handful of crispy bacon bits added that satisfying crunch, while the sour cream and jalapeños gave a cool‑heat contrast that made the dish dance on the palate. The look on his face when he took that first bite was priceless; he declared it “the best thing ever,” and the rest of the family quickly followed suit.
What makes this recipe truly special is the balance of textures and flavors—crunch, creaminess, salt, heat, and a hint of freshness from the green onions. It’s a dish that can turn a lazy weeknight into a celebration, and it’s surprisingly simple, requiring only a handful of pantry staples and a freezer bag. But wait—there’s a secret trick that elevates the fries from good to legendary, and I’m saving it for the middle of the method so you’ll stay glued to the page. Trust me, you’ll want to try it the moment you finish reading.
Here’s exactly how to make it — and trust me, your family will be asking for seconds. The steps are straightforward, the ingredients are forgiving, and the end result is pure, indulgent comfort that you can serve any night you crave something hearty and satisfying. Grab your favorite baking sheet, preheat that oven, and let’s dive into the crispy, cheesy world that awaits.
🌟 Why This Recipe Works
- Flavor Depth: The combination of sharp cheddar and smoky bacon creates a layered taste experience that hits both the umami and salty notes, making each bite feel rich and satisfying. The jalapeños add a subtle heat that cuts through the richness without overwhelming the palate.
- Texture Harmony: Thick‑cut fries stay fluffy inside while achieving a crisp exterior, and the cheese forms a glossy, gooey blanket that adheres to every ridge. The bacon bits introduce a crunchy contrast, while the sour cream adds a silky finish.
- Ease of Execution: All components can be prepared on a single sheet pan, meaning fewer dishes and less cleanup—a win for busy families. The steps are linear, so you won’t need to juggle multiple pots or pans.
- Time Efficiency: With a 15‑minute prep and 30‑minute bake, you can have a restaurant‑quality snack on the table in under an hour. This makes it perfect for spontaneous cravings or last‑minute gatherings.
- Versatility: The base recipe is a canvas—you can swap cheddar for pepper jack, bacon for chorizo, or add extra veggies for a lighter twist. It adapts to dietary preferences without losing its core appeal.
- Ingredient Quality: Using high‑quality olive oil and fresh, sharp cheddar ensures that the flavors shine through, while frozen thick‑cut fries give you that restaurant‑style crunch without the deep‑fry hassle.
- Crowd‑Pleaser Factor: Whether you’re feeding kids, teens, or adults, the combination of cheese, bacon, and fries is universally beloved. It’s a safe bet for potlucks, game nights, or a cozy family movie night.
- Comfort Food Science: The warm, melty cheese triggers dopamine release, while the salty bacon satisfies cravings for savory snacks. This psychological boost makes the dish feel like a hug in a bowl.
🥗 Ingredients Breakdown
The Foundation: Fries & Oil
Frozen Thick‑Cut French Fries are the backbone of this dish. Their thickness ensures a fluffy interior that stays soft even after the cheese melts, while the outer layer becomes irresistibly crisp when baked at a high temperature. I always recommend choosing a brand that lists real potatoes as the first ingredient—no mystery fillers. The 2 tablespoons of olive oil not only help the fries brown evenly but also add a subtle fruitiness that balances the richness of the cheese and bacon.
Cheese & Creamy Elements
The star of the show is the 2 cups of shredded sharp cheddar cheese. Sharp cheddar brings a bold, tangy flavor that melts beautifully, creating those stretchy, glossy strands we all love. If you want a bit of spice, you could swap half of it for pepper jack, but the classic sharp cheddar never disappoints. The 1 cup of sour cream is added at the end, providing a cool, tangy counterpoint that prevents the dish from feeling overly heavy.
The Secret Weapons: Bacon & Heat
Crispy bacon bits, measured at 1 cup, deliver smoky depth and a satisfying crunch. I like to bake the bacon separately until it’s extra crisp, then crumble it—this ensures the bits stay crunchy even after being folded into the hot fries. The 1/2 cup of sliced jalapeños introduces a gentle heat that awakens the palate without stealing the spotlight from the cheese. If you’re sensitive to spice, feel free to halve the amount or replace with mild green chilies.
Finishing Touches: Freshness & Color
A quarter‑cup of chopped green onions adds a pop of color and a fresh, mildly oniony bite that brightens the whole plate. Their mild sharpness cuts through the richness, making each forkful feel balanced. You can also use chives or scallions if you prefer a milder flavor. All these ingredients together create a symphony of taste, texture, and visual appeal that’s hard to resist.
With your ingredients prepped and ready, let's get cooking. Here's where the fun really begins...

🍳 Step-by-Step Instructions
-
Preheat your oven to 425°F (220°C) and line a large rimmed baking sheet with parchment paper. The high heat is essential for achieving that coveted crisp on the fries while keeping the interior fluffy. While the oven warms, spread the frozen thick‑cut fries in an even single layer, making sure they’re not overlapping. This is the moment where you’ll hear the faint sizzle as the oil begins to coat the potatoes.
💡 Pro Tip: Toss the fries with olive oil and a pinch of sea salt in a large bowl before arranging them on the sheet. This ensures every fry gets a thin, even coating. -
Slide the pan into the oven and bake for 20‑25 minutes, flipping the fries halfway through. You’ll know they’re ready when the edges turn a deep golden brown and you can hear a faint crackle as the hot air rushes past them. Keep an eye on the color; you want them crisp, not burnt. While they bake, you can start preparing the cheese and toppings.
-
While the fries are baking, shred the sharp cheddar cheese if you haven’t bought it pre‑shredded. Freshly shredded cheese melts more evenly and releases more flavor than pre‑packaged varieties that often contain anti‑caking agents. Set the cheese aside in a bowl, and if you’re using jalapeños, give them a quick rinse and slice them thinly. The thin slices will distribute heat evenly throughout the dish.
💡 Pro Tip: Pat the jalapeño slices dry with a paper towel to avoid excess moisture, which can make the cheese soggy. -
When the fries have reached that perfect golden hue, remove the pan and immediately sprinkle the shredded cheddar over the hot surface. The residual heat will begin to melt the cheese, creating a glossy veil that hugs each fry. Toss the fries gently with a spatula so the cheese coats them evenly. This is where the magic starts to happen—watch the cheese melt and bubble, releasing a buttery aroma that fills the kitchen.
⚠️ Common Mistake: Adding the cheese too early, before the fries are fully crisp, can cause the cheese to slide off and become greasy. Wait until the fries are at their peak crispness. -
Scatter the crispy bacon bits over the cheesy fries, allowing them to nestle into the melted cheese. The bacon’s smoky scent will mingle with the cheddar, creating an irresistible aroma that makes your mouth water. At this point, you can also add the sliced jalapeños if you enjoy a spicier profile. The heat from the fries will slightly soften the jalapeños, mellowing their bite while preserving a subtle crunch.
💡 Pro Tip: For an extra layer of flavor, drizzle a tiny drizzle of hot sauce over the top before serving. -
Return the pan to the oven for an additional 3‑5 minutes, just long enough for the cheese to fully melt and start to bubble at the edges. You’ll see the cheese turn a slightly deeper amber, and tiny pockets of steam will escape, indicating it’s perfectly gooey. This short second bake ensures the cheese and bacon fuse together, creating a cohesive coating.
-
While the fries finish their final bake, whisk the sour cream until it’s smooth and creamy. If you like a little extra zing, stir in a pinch of smoked paprika or a dash of lime juice. This will give the sour cream a subtle depth that pairs beautifully with the salty, cheesy fries.
-
Remove the pan from the oven and immediately dollop generous spoonfuls of the seasoned sour cream across the top. The contrast of the cool, tangy cream against the hot, melty cheese creates a delightful temperature play. Sprinkle the chopped green onions over everything, allowing their fresh, slightly sharp flavor to brighten each bite.
-
Serve the loaded cheesy fries hot, straight from the pan, with extra sour cream on the side for those who want an extra drizzle. The fries should be crisp on the outside, gooey in the middle, and topped with a symphony of savory, spicy, and creamy notes. Go ahead, take a taste — you’ll know exactly when it’s right.
💡 Pro Tip: Let the fries rest for two minutes after pulling them from the oven; this allows the cheese to set slightly, making them easier to serve without everything sliding off.
And there you have it! But before you dig in, let me share some tips that will take this from great to absolutely unforgettable...
🔐 Expert Tips for Perfect Results
The Taste Test Trick
Before you commit the entire batch to the oven, pull out a single fry, melt a tiny bit of cheese on it, and taste. This quick test tells you whether you need a pinch more salt, a splash more oil, or a dash of extra pepper. I once discovered that my oven runs a degree cooler, and this tiny test saved the whole dish from being under‑seasoned.
Why Resting Time Matters More Than You Think
After the final bake, let the fries rest for about two minutes. This short pause allows the cheese to thicken just enough to cling to each fry, preventing a soggy plate. The result is a fork‑friendly dish where the cheese doesn’t slide off the moment you lift a fry.
The Seasoning Secret Pros Won’t Tell You
A pinch of smoked paprika or a dash of garlic powder added to the olive oil before tossing the fries can elevate the flavor profile dramatically. The subtle smokiness complements the bacon, while the garlic adds depth without overpowering the cheddar. I always keep a small spice jar on hand for this exact reason.
Crispiness Hack: The Double‑Bake Method
If you crave an ultra‑crunchy exterior, consider a quick double‑bake. After the first 20‑minute bake, turn off the oven, let the fries cool for five minutes, then crank the heat back up to 450°F (232°C) for an extra 5‑7 minutes. This extra burst of heat drives out any lingering moisture, giving you a fry that snaps with every bite.
Balancing Heat and Cool
The jalapeños bring heat, but the sour cream provides a cooling counterpoint. If you find the heat too intense, drizzle a little extra sour cream or add a sprinkle of shredded mozzarella, which melts into a milder, creamy layer. I’ve experimented with both and love how the balance shifts the overall experience.
🌈 Delicious Variations to Try
One of my favorite things about this recipe is how versatile it is. Here are some twists I've tried and loved:
Southwest Fiesta
Swap the sharp cheddar for a blend of pepper jack and Monterey Jack, add corn kernels, black beans, and a sprinkle of cumin. The result is a bright, slightly spicy dish with a southwestern flair, perfect for game day.
BBQ Bacon Blast
Replace the plain bacon bits with bacon tossed in your favorite BBQ sauce before crisping. Add a drizzle of extra BBQ sauce over the finished fries and a handful of pickled red onions for tang. This variation brings sweet, smoky, and tangy notes that dance together.
Veggie‑Loaded Delight
Add roasted red peppers, sautéed mushrooms, and spinach leaves just before the final cheese melt. Use a plant‑based cheddar alternative for a vegetarian-friendly version. The earthy vegetables add depth and a burst of color.
Garlic Parmesan Crunch
Mix minced garlic and grated Parmesan into the olive oil before tossing the fries. Top with extra Parmesan after the cheese melt and finish with a sprinkle of fresh parsley. This gives a fragrant, Italian‑inspired twist.
Spicy Sriracha Drizzle
After plating, drizzle a mixture of sriracha and honey over the fries for a sweet‑heat glaze. Add a few toasted sesame seeds for texture. The sweet heat balances the richness of the cheese and bacon beautifully.
📦 Storage & Reheating Tips
Refrigerator Storage
Allow the loaded fries to cool to room temperature, then transfer them to an airtight container. They’ll keep nicely for up to 2 days. When you’re ready to eat, spread them on a baking sheet and reheat in a 400°F (200°C) oven for 8‑10 minutes, or until the cheese re‑melts and the fries regain their crunch.
Freezing Instructions
If you want to prep ahead, freeze the baked fries (without cheese or toppings) on a tray until solid, then transfer to a zip‑top bag. They’ll stay good for up to 2 months. To serve, bake frozen fries straight from the bag at 425°F (220°C) for 20‑25 minutes, then add cheese, bacon, and the remaining toppings as described.
Reheating Methods
The trick to reheating without drying out the fries is to add a splash of water (about a tablespoon) to the pan before covering it with foil for the first few minutes. This creates steam that revives the interior softness while the oven’s dry heat restores the exterior crispness. Finish uncovered for the last 2‑3 minutes to let the cheese bubble again.