Introduction to Guilt-Free Peanut Butter Cups
In the realm of indulgent desserts, peanut butter cups hold a special place in our hearts. Their perfect balance of creamy peanut butter and rich chocolate has made them a beloved treat for many. Unfortunately, traditional recipes often come packed with sugars and unhealthy fats that can leave us feeling guilty after a sweet indulgence. This is where guilt-free peanut butter cups come into play, providing a delicious, healthier alternative that doesn’t compromise on taste. Not only do these homemade delights cater to your cravings, but they also allow you to enjoy a treat that aligns with your wellness goals.
Guilt-free peanut butter cups are perfect for satisfying your sweet tooth without the remorse that typically follows indulging in sugary confections. By using wholesome ingredients, you can create a dessert that is both nourishing and delicious. With a few simple substitutions, you can craft a version of peanut butter cups that are lower in sugar and higher in nutrients, making them an ideal choice for anyone looking to indulge mindfully. In this article, we will explore the recipe in detail, breaking down the steps and ingredients to help you create your own batch of guilt-free peanut butter cups.
Understanding the Ingredients
All-Natural Peanut Butter
The star ingredient of our guilt-free peanut butter cups is all-natural peanut butter. Unlike conventional peanut butters that often contain added sugars, hydrogenated oils, and preservatives, all-natural peanut butter is made from just peanuts (and sometimes a pinch of salt). This simple ingredient list not only preserves the nutty flavor and creamy texture we love but also offers numerous health benefits.
All-natural peanut butter is rich in protein, making it an excellent source of energy and helping to keep you satisfied. It contains healthy fats, primarily monounsaturated fats, which are beneficial for heart health. Additionally, this type of peanut butter is loaded with essential nutrients such as vitamin E, magnesium, and potassium. By choosing all-natural peanut butter, you can enjoy its rich taste while reaping its nutritional benefits, all without the guilt associated with added sugars.
Pure Maple Syrup or Honey
To sweeten our guilt-free peanut butter cups, we turn to natural sweeteners like pure maple syrup or honey. These options not only provide a delightful sweetness but also come with their own set of health benefits. Pure maple syrup is a fantastic alternative to refined sugar, as it contains antioxidants and minerals such as zinc and manganese, which are beneficial for overall health. Honey, on the other hand, is known for its antibacterial properties and has been used for centuries as a natural remedy for various ailments.
Both sweeteners have a lower glycemic index compared to refined sugars, meaning they won’t cause the same spikes in blood sugar levels. This makes them a more wholesome choice for satisfying your sweet cravings without the negative effects associated with processed sugars. Using either pure maple syrup or honey in your peanut butter cups ensures that you’re using a natural product that enhances the flavor while keeping the overall recipe guilt-free.
Unsweetened Cocoa Powder
To create that rich chocolate flavor we adore in peanut butter cups, unsweetened cocoa powder is the perfect ingredient. Unlike sweetened chocolate products that are often packed with sugar, unsweetened cocoa powder is a concentrated source of antioxidants and has numerous health benefits. Rich in flavonoids, cocoa powder can help improve heart health, reduce inflammation, and even enhance brain function.
In addition to its health properties, cocoa powder contributes to the depth of flavor in our guilt-free peanut butter cups without adding unwanted sugars. When combined with the other wholesome ingredients, it creates a luscious chocolate base that brings the entire dessert together. By opting for unsweetened cocoa powder, you can enjoy the rich taste of chocolate without the guilt.
Coconut Oil
Coconut oil plays a crucial role in our guilt-free peanut butter cups, serving both a functional and health-promoting purpose. This versatile ingredient helps to create the creamy texture of the chocolate base while also providing healthy fats that can support metabolism and heart health.
Coconut oil is rich in medium-chain triglycerides (MCTs), which are easily metabolized by the body and can serve as a quick source of energy. Additionally, it has antimicrobial properties that may promote gut health. When melted and combined with cocoa powder and sweetener, coconut oil creates a smooth and glossy chocolate layer that forms the perfect foundation for your peanut butter cups.
Sea Salt and Vanilla Extract
The final touches that elevate the flavor profile of our guilt-free peanut butter cups are a pinch of sea salt and a splash of vanilla extract. While they may seem like small additions, their impact on the overall taste is significant. Sea salt enhances the sweetness of the peanut butter and chocolate, creating a balanced flavor that excites the palate. It also adds a subtle crunch that contrasts beautifully with the smoothness of the filling.
Vanilla extract, on the other hand, brings warmth and depth to the dessert. The complex flavor of vanilla complements the nuttiness of the peanut butter and the richness of the chocolate, tying all the flavors together beautifully. By incorporating these two ingredients, you can take your guilt-free peanut butter cups to the next level, making them an irresistible treat you’ll be proud to serve or enjoy yourself.
Step-by-Step Guide to Making Guilt-Free Peanut Butter Cups
Preparing the Molds
Before diving into the making of your guilt-free peanut butter cups, it’s essential to prepare your molds. This step is crucial for ensuring that the finished cups are easy to remove and maintain their shape. You can use a standard muffin tin lined with cupcake liners or opt for silicone molds, which often allow for easier release of the chocolate cups after they’ve set.
If using a muffin tin, place the liners in each of the slots, making sure they are well-positioned to hold the layers of chocolate and peanut butter. If you choose silicone molds, ensure they are clean and dry before pouring in the chocolate mixture. Preparing your molds ahead of time will streamline the process and help you achieve beautifully shaped peanut butter cups.
Creating the Chocolate Base
Once your molds are prepared, it’s time to create the chocolate base for your guilt-free peanut butter cups. Begin by melting the coconut oil in a small saucepan over low heat. Once melted, remove it from the heat and whisk in the unsweetened cocoa powder and your chosen sweetener (pure maple syrup or honey).
It’s important to mix these ingredients thoroughly to create a smooth and uniform mixture. The texture should be silky and pourable, allowing it to spread easily in your molds. If the mixture is too thick, you can add a little more melted coconut oil until it reaches the desired consistency. This chocolate base will form the bottom layer of your cups, providing a rich and decadent foundation for the creamy peanut butter filling.
Layering the Chocolate Base
With your chocolate base ready, it’s time to pour and spread the mixture into your prepared molds. Carefully spoon the chocolate mixture into each mold, filling them about one-third of the way full. Use a small spatula or the back of a spoon to spread the chocolate evenly across the bottom of each cup, ensuring that it reaches the edges for a uniform layer.
Once all the molds are filled, place them in the freezer for about 15-20 minutes to allow the chocolate base to set properly. This step is crucial, as it creates a solid foundation for the peanut butter filling. After the chocolate has firmed up, you’ll be ready to add the creamy peanut butter layer, making your guilt-free peanut butter cups even more irresistible.
Stay tuned for the next part of the article, where we will dive into creating the peanut butter filling and the final assembly of these delightful treats!
{{image_2}}
Preparing the Peanut Butter Filling
To achieve the perfect peanut butter filling for your guilt-free peanut butter cups, start by selecting high-quality, natural peanut butter. Look for brands that contain only peanuts and perhaps a pinch of salt, avoiding added sugars and unhealthy oils. The key to a smooth and creamy peanut butter filling lies in the mixing process.
In a medium bowl, combine 1 cup of natural peanut butter, 2 tablespoons of maple syrup, and 1 teaspoon of vanilla extract. The maple syrup not only sweetens the filling but also adds a delightful depth of flavor. Using a hand mixer or a whisk, blend the ingredients until they are creamy and well incorporated. If the mixture feels too thick, a splash of almond milk can be added to loosen it up without compromising its texture.
This filling should be luscious and easily spreadable, providing a perfect contrast to the firm chocolate base. For an extra touch, consider adding a pinch of sea salt to enhance the peanut butter flavor. Once you’ve achieved that creamy consistency, set the bowl aside, allowing the flavors to meld while you prepare the chocolate base.
Adding the Peanut Butter Layer
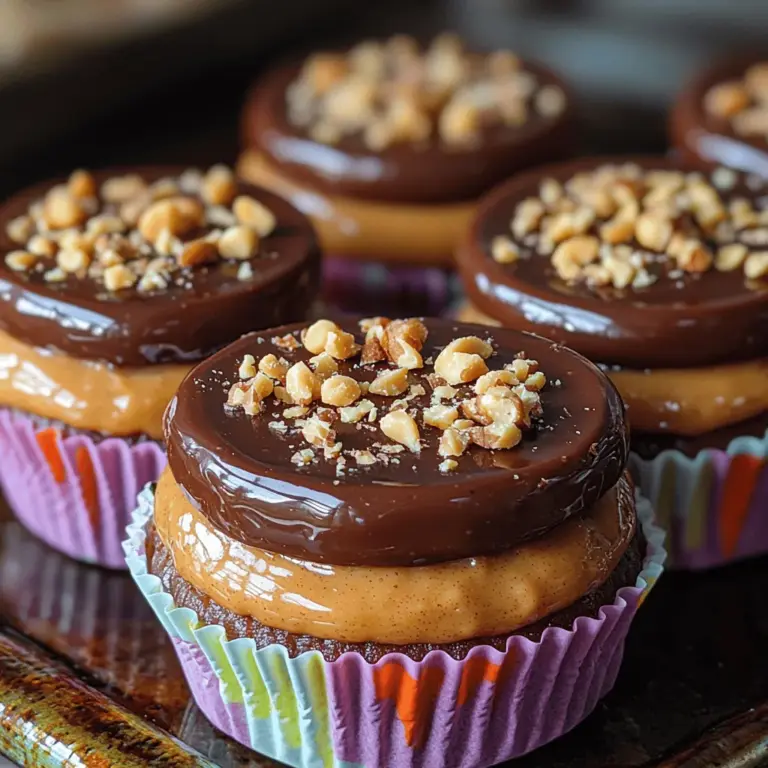
With your chocolate base already set in the muffin liners, it’s time to add the peanut butter layer. Using a tablespoon, scoop the creamy peanut butter filling and gently drop it onto the center of each chocolate-filled liner. To ensure even distribution, lightly press down the filling with the back of the spoon. Aim for an even thickness, about 1/2 inch, which will create a delightful bite without overwhelming the chocolate.
For a compact filling, press the peanut butter gently but firmly into the chocolate layer, ensuring that it adheres well. This step is crucial; if the filling is not compacted enough, it might separate from the chocolate when you take a bite. Once all the cups are filled, it’s time to move on to the final chocolate layer.
Covering with Remaining Chocolate
The last step in the assembly of your peanut butter cups is covering the peanut butter layer with the remaining chocolate. Melt an additional 1 cup of dark chocolate using your preferred method—either in a microwave in short bursts or over a double boiler. Stir until the chocolate is completely smooth and glossy.
Using a spoon or a small spatula, carefully pour the melted chocolate over the peanut butter layer in each cup. Ensure that you cover the filling completely, allowing the chocolate to flow over the edges for a nice finish. To eliminate air bubbles, gently tap the muffin tray on your countertop a few times. This will help the chocolate settle and ensure a smooth top.
Once each cup is generously covered, use the back of your spoon to smooth out any uneven spots. It’s okay if the chocolate layer isn’t perfectly flat; a little texture can add to the homemade charm of your treats. After you’ve finished covering all the cups, set them aside to cool slightly before chilling them in the refrigerator.
Adding Optional Toppings
To elevate your guilt-free peanut butter cups, consider adding some optional toppings. Chopped nuts, such as crushed almonds or pecans, can add a delightful crunch and enhance the flavor profile. Simply sprinkle your chosen nuts over the chocolate layer while it’s still soft, pressing them down slightly to ensure they adhere.
For a more visually appealing finish, drizzle a little melted chocolate over the tops once they have set. This not only adds a decorative touch but also enhances the chocolate flavor. You might also experiment with a sprinkle of sea salt or some cacao nibs for an extra pop of texture and flavor. These touches can turn a simple treat into an impressive dessert worthy of sharing.
Chilling and Setting
Now that your cups are fully assembled, it’s time to let them chill and set. Place the muffin tray in the refrigerator for at least 1 to 2 hours. This step is essential; allowing the chocolate to harden completely will make it easier to remove the cups from their liners without breaking.
Once the cups have set, you can gently peel away the liners. If you find them sticking, using a pair of kitchen scissors to cut down the side of the liner can help release the cups without any damage. After removing the liners, place the cups on a decorative plate or in an airtight container for storage.
Serving Suggestions and Presentation Ideas
Displaying Your Peanut Butter Cups
Presentation can turn your homemade peanut butter cups from simple snacks into eye-catching treats. Arrange the cups on a decorative plate, perhaps garnished with a few whole nuts or a dusting of cocoa powder for added flair. You could also place them in mini cupcake liners for a fun, festive look.
If serving at a gathering, consider creating a dessert bar where guests can mix and match their toppings or pair the cups with fresh fruit like strawberries or banana slices for a refreshing contrast. A drizzle of caramel sauce or a sprinkle of crushed sea salt can also enhance the visual appeal and flavor profile.
Pairing Ideas
To create an even more enjoyable experience, consider pairing your peanut butter cups with complementary beverages. Herbal teas, such as chamomile or peppermint, offer a soothing contrast to the richness of the cups. Alternatively, a glass of chilled almond milk or coconut milk can enhance the nutty flavors while providing a creamy texture that complements the chocolate.
For an adult gathering, a rich coffee or espresso can provide a delightful contrast to the sweetness of the peanut butter cups. These pairing ideas not only elevate the experience but also cater to various taste preferences, ensuring that everyone can enjoy your delicious treats.
Nutritional Information
Breakdown of Nutritional Benefits
Each guilt-free peanut butter cup offers a delightful balance of flavors while remaining mindful of nutritional content. Here’s a detailed analysis of the nutritional benefits per serving (assuming the recipe yields 12 cups):
– Calories: Approximately 100 calories
– Protein: 3 grams
– Healthy Fats: 8 grams (primarily from peanut butter)
– Sugar: 3 grams (natural sugars from maple syrup and chocolate)
These numbers make the peanut butter cups a guilt-free indulgence, rich in healthy fats and protein while keeping added sugars to a minimum. The use of natural ingredients not only contributes to the overall taste but also supports a nutritious diet, making these cups an ideal snack option for both children and adults.
Conclusion
Guilt-free peanut butter cups are not just a delicious treat; they offer a way to indulge without the guilt often associated with desserts. By using wholesome ingredients and following this straightforward recipe, you can create a delightful snack that satisfies your cravings and nourishes your body. Whether enjoyed as a post-workout snack or a sweet end to a meal, these homemade peanut butter cups are sure to become a favorite in your household.
With their rich flavor and simple preparation, they embody the perfect balance of health and indulgence, making them a go-to recipe for any dessert lover. So, gather your ingredients, follow the steps, and enjoy the satisfaction of creating a dessert that’s both tasty and nourishing. Your taste buds—and your body—will thank you!


