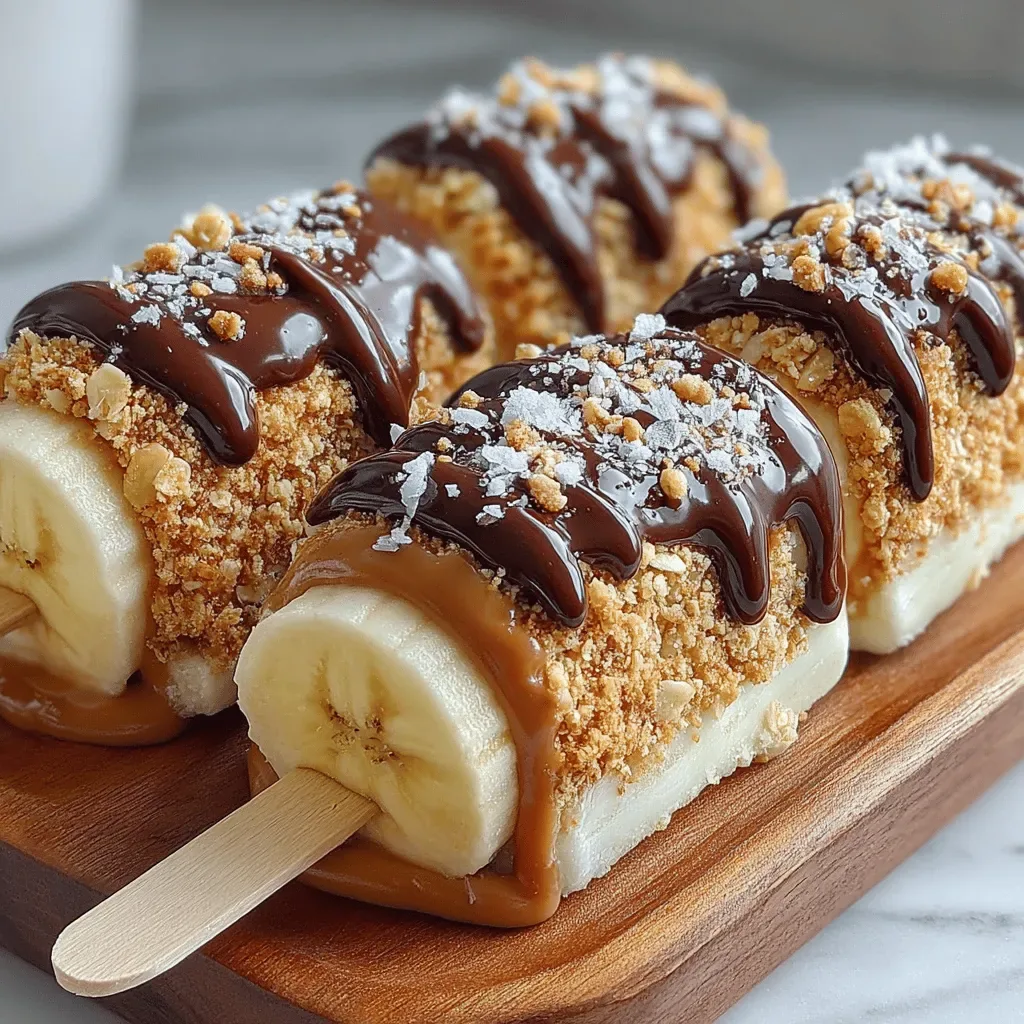
Imagine a bite‑size summer treat that feels like indulgence but fuels your body with wholesome nutrition. Frozen Peanut Butter Banana Pops deliver that perfect balance of creamy, sweet, and salty, all on a stick you can enjoy anywhere.
What makes these pops truly special is the marriage of naturally sweet bananas, protein‑packed peanut butter, and a light yogurt coating that keeps each bite silky while adding a subtle tang.
Kids, athletes, and anyone craving a guilt‑free dessert will love them—whether you serve them after a workout, as a school snack, or at a weekend brunch.
The process is straightforward: slice bananas, dip them in a peanut‑butter‑yogurt blend, roll in optional toppings, and freeze until solid. In just a few minutes of prep you’ll have a freezer‑ready treat that stays fresh for weeks.
Why You'll Love This Recipe
Protein‑Rich Power: Peanut butter and Greek yogurt provide a solid protein boost, helping you recover after exercise while keeping you satisfied longer.
Natural Sweetness: Ripe bananas supply natural sugars and potassium, eliminating the need for refined sweeteners and supporting heart health.
Customizable Crunch: Coat the pops with nuts, seeds, or dark chocolate shards for texture variation, letting you tailor each bite to your taste.
Freezer‑Friendly Fun: Once frozen, the pops stay fresh for weeks, making them an effortless make‑ahead snack for busy families.
Ingredients
For these frozen pops I rely on a handful of whole‑food staples that bring flavor, texture, and nutrition. The bananas act as the natural base, while creamy peanut butter adds healthy fats and protein. Greek yogurt creates a smooth coating that freezes beautifully, and a drizzle of honey or maple syrup offers a gentle sweetness. Optional toppings such as chopped nuts, shredded coconut, or dark‑chocolate chips add crunch and extra antioxidants.
Main Ingredients
- 4 ripe medium bananas
- ½ cup natural peanut butter (smooth or crunchy)
- ½ cup plain Greek yogurt (full‑fat or low‑fat)
- 2 tablespoons honey or maple syrup
Coating & Toppings
- ¼ cup finely chopped almonds or peanuts
- ¼ cup unsweetened shredded coconut
- 2 tablespoons dark chocolate chips (optional)
- Pinch of sea salt
The synergy of these ingredients creates a treat that’s creamy inside, slightly crunchy outside, and perfectly sweet without being cloying. Peanut butter supplies heart‑healthy monounsaturated fats, while Greek yogurt adds calcium and probiotics. The optional toppings introduce extra fiber, antioxidants, and a satisfying bite, turning a simple frozen snack into a nutritionally balanced mini‑dessert.
Step-by-Step Instructions
Preparing the Fruit
Start by peeling the bananas and cutting them into ½‑inch thick slices. Insert a sturdy wooden or silicone pop stick into the flat side of each slice, pressing gently so the stick is secure. This step ensures the pops stay intact when you dip them and later when they freeze.
Making the Peanut Butter Yogurt Dip
In a medium bowl, whisk together the peanut butter, Greek yogurt, and honey (or maple syrup) until the mixture is smooth and glossy. The yogurt thins the peanut butter just enough to coat the banana without dripping excessively, while the honey adds a gentle glaze that helps toppings adhere.
Assembling the Pops
- Dip the banana. Hold each banana slice by its stick and submerge it into the peanut‑butter‑yogurt mixture, turning slowly to achieve an even coat. Let excess dip drip back into the bowl—this prevents clumps of sauce on the surface.
- Roll in toppings. Immediately roll the coated banana in your chosen topping blend (almonds, coconut, chocolate chips, or a mix). The slight stickiness of the dip locks the toppings in place, creating a crunchy outer layer.
- Freeze quickly. Place each pop on a parchment‑lined baking sheet, ensuring they don’t touch. Sprinkle a tiny pinch of sea salt over each for a flavor contrast. Transfer the sheet to the freezer and let the pops set for at least 2 hours.
Serving & Storing
Once solid, pop the treats into a freezer‑safe container or zip‑lock bag. They can be stored for up to 3 weeks. To serve, simply run the sticks under warm water for a few seconds to loosen them, then enjoy a cool, protein‑rich snack that’s ready anytime.
Tips & Tricks
Perfecting the Recipe
Use fully ripe bananas. The sweeter and softer the fruit, the easier it is to slice and the better the texture after freezing.
Pat the dip dry. If the mixture looks too runny, whisk in a teaspoon of extra Greek yogurt; this prevents soggy pops.
Freeze on a single layer. Overcrowding the tray creates uneven freezing and may cause pops to stick together.
Pre‑chill toppings. Cold nuts or chocolate chips stay crunchy longer once the pop is frozen.
Flavor Enhancements
Add a splash of vanilla extract to the dip for a warm undertone, or mix in a pinch of cinnamon for a subtle spice. For a tropical twist, swirl in a teaspoon of shredded coconut into the yogurt mixture before dipping.
Common Mistakes to Avoid
Avoid using over‑ripe bananas that are mushy—they can break apart during dipping. Also, don’t skip the quick‑freeze step; a slow freeze creates larger ice crystals, resulting in a grainy texture.
Pro Tips
Line the tray with parchment. This makes removal effortless and keeps the pops from sticking to the metal surface.
Store in portion bags. Separate pops into individual zip‑lock bags; you’ll grab exactly what you need without thawing the whole batch.
Use a silicone pop stick. Silicone is flexible, reduces breakage, and is safe for the freezer environment.
Finish with a drizzle. Right before serving, melt a small amount of dark chocolate and drizzle over the pops for an elegant finish.
Variations
Ingredient Swaps
Swap the classic peanut butter for almond butter or cashew butter for a different nutty profile. Replace Greek yogurt with coconut‑milk yogurt for a dairy‑free version, and use agave nectar instead of honey if you prefer a lower‑glycemic sweetener.
Dietary Adjustments
For a vegan pop, choose plant‑based yogurt and a nut butter without added honey. Gluten‑free diners can enjoy the recipe as‑is; just verify that any added chocolate chips are certified gluten‑free. To lower the carb count, substitute half the banana with frozen berries.
Serving Suggestions
Pair the pops with a side of fresh fruit salad for a colorful brunch spread, or serve them alongside a chilled green‑tea smoothie for a post‑workout recharge. They also make a fun addition to a kid‑friendly picnic board with other frozen treats.
Storage Info
Leftover Storage
Once frozen solid, transfer the pops to a zip‑lock freezer bag or airtight container. Remove as much air as possible to prevent freezer burn. Stored this way they stay fresh for up to three weeks without losing texture or flavor.
Reheating Instructions
These pops are meant to be enjoyed frozen, but if you prefer a softer bite, run the stick under warm tap water for 5–10 seconds before eating. Avoid microwaving, as it can create uneven melting and affect the creamy coating.
Frequently Asked Questions
This Frozen Peanut Butter Banana Pop recipe blends wholesome ingredients, simple techniques, and endless customization into a snack that feels both indulgent and nutritious. By following the detailed steps, storage tips, and creative variations, you’ll have a freezer‑ready treat that satisfies cravings while supporting your health goals. Feel free to experiment with flavors, toppings, and dietary tweaks—making each batch uniquely yours. Enjoy the cool, creamy goodness straight from the freezer, and share the joy with family and friends!