I still remember the first time I tried to coax a cloud of silky white chocolate mousse out of a tiny tartlet shell. It was a chilly autumn evening, the kitchen was bathed in the golden glow of the oven light, and the scent of melted butter and toasted nuts drifted through the air like a promise. When I lifted the lid of the cooling rack, a fragrant steam rose, carrying whispers of vanilla and a faint caramelized edge that made my mouth water before the first bite. I was sitting at my kitchen island, a spoon in hand, and the world seemed to pause for a moment as the mousse settled into its buttery cradle, glossy and inviting.
That moment sparked a lifelong obsession with creating desserts that feel both luxurious and comforting, and the Elegant White Chocolate Mousse Tartlets quickly became my go‑to showstopper for celebrations big and small. The magic lies in the balance: a buttery, crumbly crust that gives way to a mousse so light it practically floats, yet rich enough to satisfy the most discerning sweet tooth. Imagine serving these at a dinner party and watching guests’ eyes widen as they tap the delicate crust, hearing that soft crack, and then diving into the velvety interior that melts on the tongue like a cloud of sweet silk.
What makes this recipe truly stand out is the way each component sings on its own while harmonizing into a single, unforgettable bite. The secret isn’t just the premium white chocolate; it’s the technique of tempering the cream, the careful folding of the egg yolks, and the final chill that sets the mousse to the perfect, airy consistency. I’ve tweaked this recipe over the years, adding a dash of citrus zest here, a whisper of sea salt there, and each iteration taught me something new about flavor layering. But wait until you see the secret trick in step 4 that turns a good mousse into an extraordinary one…
Ready to create a dessert that feels like a celebration in every bite? Here’s exactly how to make it — and trust me, your family will be asking for seconds, thirds, and maybe even a whole extra tray. Grab your favorite mixing bowls, preheat that oven, and let’s dive into the world of elegant, airy indulgence. The journey from raw ingredients to a polished plate is as delightful as the final taste, and I’ll be right there with you, sharing every tip, trick, and tiny anecdote that makes this recipe truly unforgettable.
🌟 Why This Recipe Works
- Flavor Depth: The combination of high‑quality white chocolate and a touch of vanilla creates a sweet, buttery flavor that’s both rich and nuanced. By incorporating a pinch of sea salt, you amplify the chocolate’s natural sweetness, turning every bite into a symphony of taste.
- Texture Harmony: The crust offers a buttery crunch that contrasts perfectly with the mousse’s feather‑light, airy texture. This duality keeps the palate excited, ensuring you never get bored with the same mouthfeel.
- Ease of Execution: Despite its elegant appearance, the recipe uses straightforward techniques that any confident home cook can master. No fancy equipment is required—just a whisk, a saucepan, and a little patience.
- Time Efficient: While the mousse needs a chilling period, the active cooking time is under 30 minutes, making it ideal for weekend gatherings or last‑minute dinner parties.
- Versatility: These tartlets can be dressed up with fresh berries, a drizzle of raspberry coulis, or even a sprinkle of toasted almond slivers, allowing you to customize them for any season or theme.
- Nutrition Balance: Using heavy cream and real chocolate provides a satisfying dose of healthy fats, while the modest sugar amount keeps the dessert indulgent but not overly sweet.
- Ingredient Quality: The recipe emphasizes premium white chocolate and fresh, unsalted butter, which together elevate the final flavor profile far beyond store‑bought mixes.
- Crowd‑Pleasing Factor: The visual appeal of a glossy, ivory‑colored mousse set in a golden crust is enough to draw compliments before the first spoon even hits the plate.
🥗 Ingredients Breakdown
The Foundation: Crust & Base
A sturdy yet tender crust is the canvas for any great tartlet, and in this recipe we use a simple shortbread‑style base made from flour, butter, and a pinch of sugar. The butter should be cold and cut into the flour until the mixture resembles coarse sand; this creates that melt‑in‑your‑mouth crumbly texture once baked. If you prefer a gluten‑free option, almond flour works beautifully, adding a subtle nutty undertone that complements the white chocolate. For the ultimate crunch, I like to sprinkle a thin layer of finely grated Parmesan on the crust before baking—don’t worry, it won’t make the tart savory; it just adds a hidden depth of umami that balances the sweetness.
Aromatics & Spices: The Flavor Builders
Vanilla extract is the unsung hero here, delivering a fragrant backbone that lifts the mousse from merely sweet to elegantly aromatic. I always reach for a pure, Madagascar‑sourced vanilla bean, scraping the seeds directly into the cream for an even richer flavor. A tiny pinch of sea salt may seem insignificant, but it acts like a conductor, bringing out the chocolate’s natural notes and preventing the dish from tasting cloyingly sweet. If you’re feeling adventurous, a dash of orange zest can add a bright citrus pop that pairs wonderfully with white chocolate.
The Secret Weapons: Mousse Magic
The mousse itself relies on a delicate balance of heavy cream, egg yolks, and white chocolate. Heavy cream provides the luscious body, while the egg yolks introduce silkiness and help stabilize the airy structure when whisked with the sugar. I recommend using a fine‑grated white chocolate, as it melts more evenly and integrates smoothly with the warm cream. A splash of liqueur—think Grand Marnier or Chambord—adds an adult twist, but it’s entirely optional if you’re serving younger guests.
Finishing Touches: Garnish & Presentation
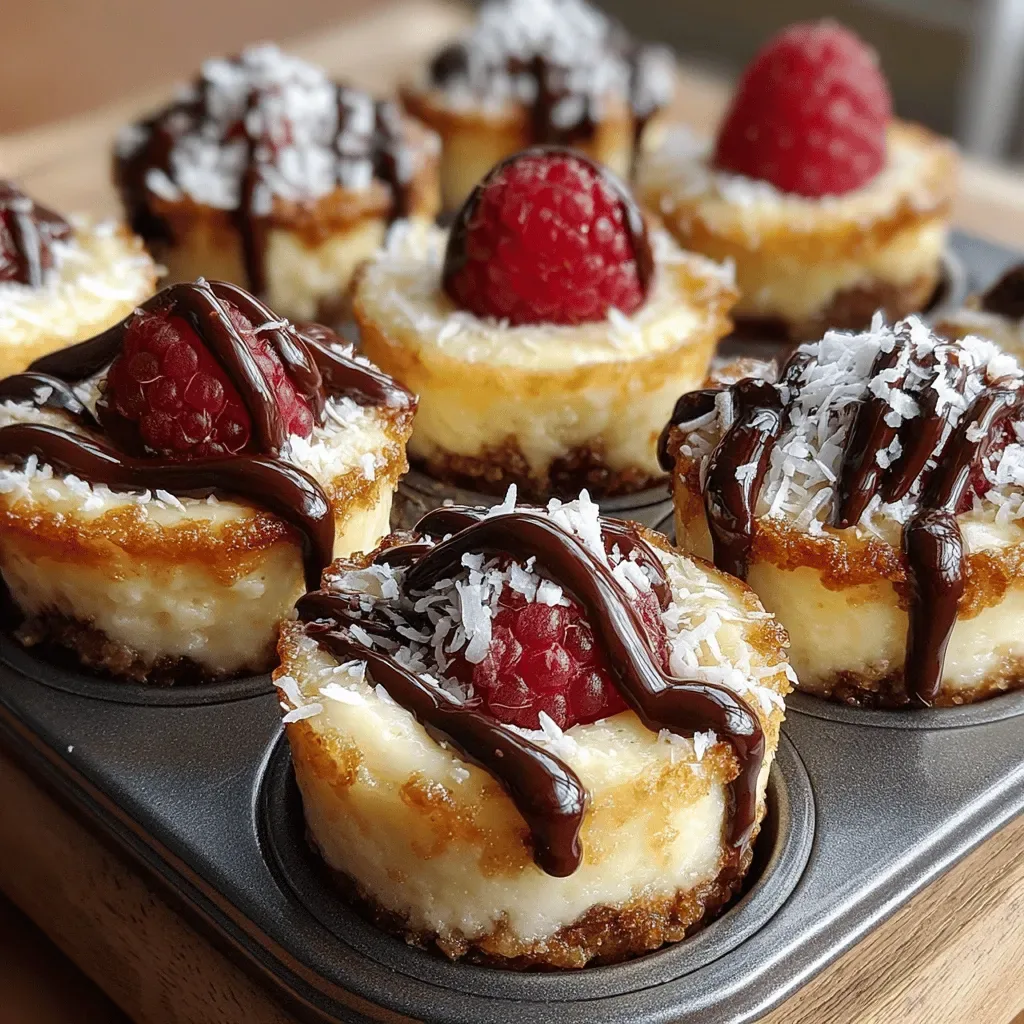
A garnish is more than just decoration; it adds texture, contrast, and an extra layer of flavor. Fresh berries—raspberries, strawberries, or blueberries—bring a tart brightness that cuts through the richness. Toasted almond slivers or pistachios contribute a satisfying crunch, while a drizzle of raspberry coulis offers a tangy ribbon of color. Finally, a light dusting of powdered sugar or edible gold leaf can turn these tartlets into a show‑stopping centerpiece for any celebration.
With your ingredients prepped and ready, let's get cooking. Here's where the fun really begins…
🍳 Step-by-Step Instructions
Preheat your oven to 350°F (175°C). While the oven warms, whisk together 1 ½ cups of all‑purpose flour, ¼ cup of powdered sugar, and a pinch of salt in a large bowl. Cut in ⅔ cup of cold, unsalted butter using a pastry cutter or your fingertips until the mixture resembles coarse crumbs. Press the dough evenly into the bottoms and up the sides of a 12‑cup muffin tin, creating a small well for the mousse later. The scent of butter will start to fill the kitchen, hinting at the buttery crust to come.
Bake the crusts for 12‑15 minutes, or until they turn a light golden‑brown and emit a nutty aroma. Keep a close eye on them; you want that perfect toasted edge without crossing into burnt territory. Once baked, remove from the oven and let them cool on a wire rack while you prepare the mousse. This cooling step is crucial—it prevents the crust from becoming soggy when the warm mousse is poured in later.
While the crust cools, begin the mousse. In a saucepan, combine 1 cup of heavy cream, 2 tablespoons of unsalted butter, and 1 teaspoon of vanilla extract. Heat over medium‑low until the butter melts and the mixture just begins to simmer—watch for tiny bubbles forming around the edges. Remove from heat and pour in 12 ounces of finely grated white chocolate, letting it sit for a minute to soften, then whisk until smooth and glossy. The aroma of melting chocolate will fill the room, a true sensory preview of the decadence to come.
In a separate bowl, whisk together 3 large egg yolks and ¼ cup of granulated sugar until the mixture becomes pale and thick, forming a ribbon when the whisk is lifted. This process, known as “ribboning,” is a visual cue that the sugar has dissolved and the yolks are ready to bind the mousse. Now, temper the yolk mixture by slowly adding a third of the warm chocolate‑cream mixture, whisking constantly to avoid scrambling the eggs. Once incorporated, pour the tempered yolks back into the saucepan with the remaining chocolate mixture and return to low heat, stirring continuously until the mixture thickens enough to coat the back of a spoon.
Remove the mousse from the heat and let it cool for about 5 minutes. Then, fold in 1 cup of whipped heavy cream, which you should have whipped to soft peaks earlier. This folding technique incorporates air without deflating the mixture, giving the mousse its signature lightness. The mousse will look glossy and slightly thickened—if you run a spatula through it, you should see a clean, slow trail.
Now, spoon the mousse into the cooled crusts, filling each about three‑quarters full. The mousse will settle slightly as it cools, so don’t worry if the surface looks a little uneven at first. Tap the tin gently on the counter to level the tops, creating a smooth canvas for the final garnish. At this point, you can add a splash of your favorite liqueur or a hint of orange zest if you’d like a subtle flavor twist.
Refrigerate the filled tartlets for at least 2 hours, or until the mousse is fully set. This chilling period is where the magic happens—the mousse firms up, the flavors meld, and the crust stays crisp. While you wait, you can prepare your garnish: lightly toast almond slivers, wash fresh berries, and whisk a quick raspberry coulis if desired. The kitchen will be buzzing with anticipation, and the aroma of toasted nuts will tease your senses.
When ready to serve, carefully remove the tartlets from the muffin tin and arrange them on a serving platter. Garnish each with a few fresh berries, a dusting of powdered sugar, and a drizzle of raspberry coulis for a pop of color. The final reveal is a visual masterpiece: ivory mousse nestled in golden crust, crowned with jewel‑like fruit. Go ahead, take a taste — you’ll know exactly when it’s right, and the smile on your guests’ faces will be the ultimate reward.
And there you have it! But before you dig in, let me share some tips that will take this from great to absolutely unforgettable…
🔐 Expert Tips for Perfect Results
The Taste Test Trick
Before you pour the mousse into the crusts, scoop a tiny spoonful and taste it. This is your moment to adjust sweetness, a pinch more sugar or a dash of sea salt can make all the difference. I once served a batch that was a shade too sweet, and a single pinch of salt instantly balanced the flavor, turning a good dessert into a spectacular one.
Why Resting Time Matters More Than You Think
Patience is a virtue, especially when it comes to mousse. The chilling period allows the air bubbles to stabilize, giving the mousse its signature light texture. Skipping this step results in a mousse that’s too soft and may even slide out of the crust, a disaster I learned the hard way during a dinner party last year.
The Seasoning Secret Pros Won’t Tell You
A pinch of smoked sea salt on the finished tartlet adds a subtle depth that elevates the white chocolate’s buttery notes. It’s a trick I borrowed from a pastry chef friend who swears by it for all his chocolate desserts. The smokiness pairs beautifully with the sweet mousse, creating a layered flavor experience.
Crust Crispness: The Double‑Bake Method
For an extra‑crunchy crust, bake the shells a second time after filling them with mousse, but only for 3‑4 minutes at 300°F (150°C). This brief second bake sets the base without melting the mousse, giving you a delightful contrast between a crisp edge and a silky center. I discovered this technique when trying to prevent soggy bottoms for a catered event.
Garnish Timing: When to Add the Finishing Touches
Add fresh berries and a drizzle of coulis just before serving, not during the chilling phase. The fruit’s acidity can soften the crust over time, and the coulis may seep into the mousse, altering its texture. Timing the garnish ensures every bite is perfectly balanced in flavor and presentation.
🌈 Delicious Variations to Try
One of my favorite things about this recipe is how versatile it is. Here are some twists I’ve tried and loved:
Citrus Zest Bliss
Add 1 teaspoon of finely grated lemon or orange zest to the melted chocolate before folding in the cream. The citrus brightens the sweet profile, creating a refreshing contrast that’s perfect for spring brunches. The aroma of citrus mingles with the vanilla, making each bite feel like a mini celebration.
Berry‑Infused Dream
Blend ½ cup of fresh strawberries into the mousse mixture before chilling. The fruit’s natural acidity cuts through the richness, while the pink hue adds a visual pop. Serve with a dusting of powdered sugar for a sweet‑and‑tart experience that’s especially popular with kids.
Nutty Caramel Crunch
Swirl a tablespoon of caramel sauce and a handful of toasted hazelnut pieces into the mousse just before filling the shells. The caramel adds a buttery depth, and the nuts provide a satisfying crunch. This variation feels like a sophisticated twist on a classic caramel tart.
Matcha Green Tea Elegance
Mix 1 teaspoon of high‑quality matcha powder into the whipped cream before folding it into the chocolate base. The earthy, slightly bitter notes of matcha balance the sweetness, creating a harmonious East‑meets‑West flavor profile. Top with a dusting of matcha for an Instagram‑ready finish.
Liqueur‑Laced Luxury
Stir in 1 tablespoon of Grand Marnier, Chambord, or Amaretto into the chocolate mixture for an adult‑only version. The alcohol adds depth and a subtle aroma that lingers on the palate, making these tartlets a perfect after‑dinner indulgence. Just remember to adjust the sugar slightly if the liqueur is particularly sweet.
📦 Storage & Reheating Tips
Refrigerator Storage
Store the tartlets in an airtight container in the refrigerator for up to 3 days. The mousse will stay firm and the crust will retain its crispness if you place a sheet of parchment paper between each tartlet to prevent them from sticking together. Before serving, let them sit at room temperature for 10‑15 minutes to allow the flavors to fully awaken.
Freezing Instructions
These tartlets freeze beautifully. Wrap each one individually in plastic wrap, then place them in a freezer‑safe bag for up to 1 month. To thaw, move them to the refrigerator overnight, then let them sit at room temperature for a few minutes before serving. The mousse may become slightly denser after freezing, but a quick whisk with a fork will restore its airy texture.
Reheating Methods
If you need to warm the tartlets slightly (for example, to melt a drizzle of chocolate), place them on a baking sheet and heat in a 300°F (150°C) oven for 5‑7 minutes. The trick to reheating without drying it out? Add a splash of heavy cream to the top of each tartlet before warming; the cream creates a gentle steam that keeps the mousse moist while giving the crust a brief, gentle crisp.