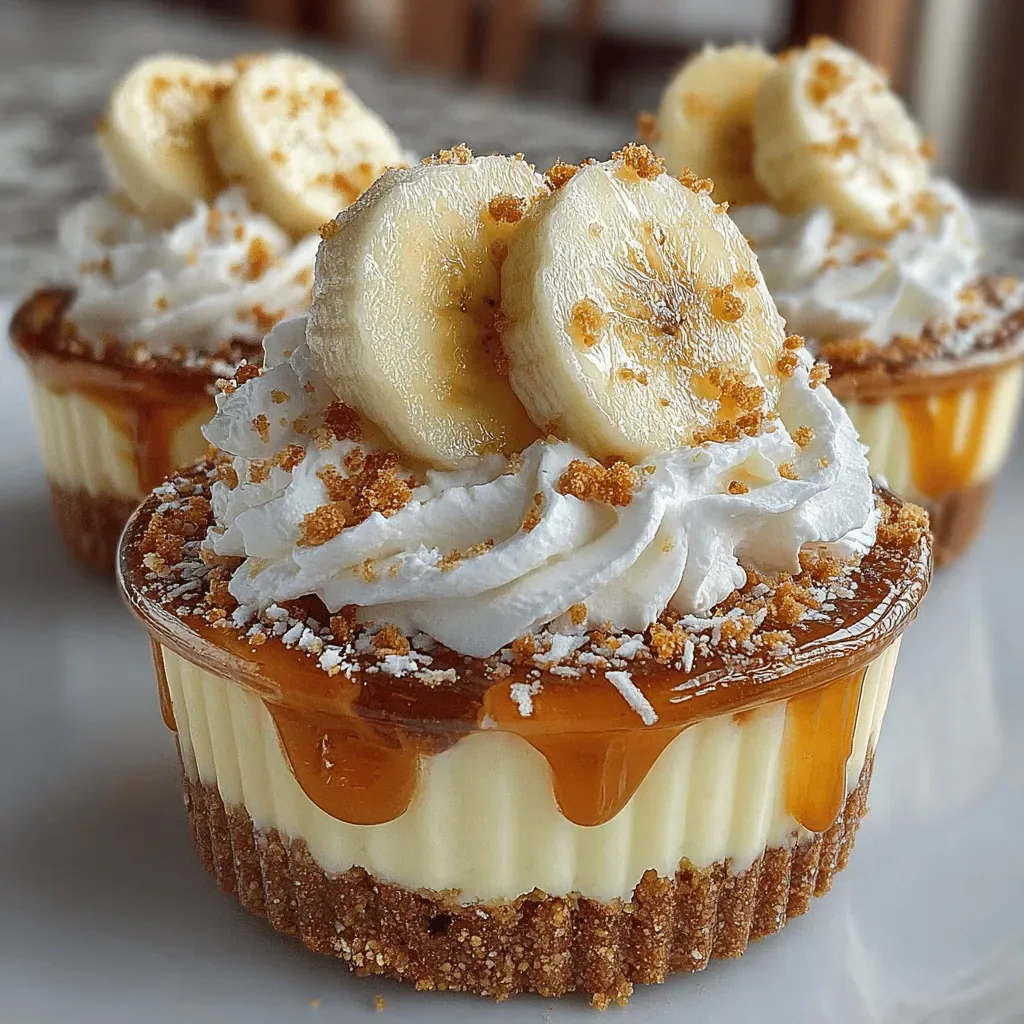
Imagine the creamy, dreamy taste of a classic banana cream pie served in a perfectly portable cup—no oven, no fuss, just pure brunch bliss. This No‑Bake Banana Cream Pie Cup captures that nostalgia while adding a modern, handheld twist that’s perfect for busy mornings or leisurely weekend brunches.
What makes this recipe stand out is the balance of textures: a buttery, crumbly crust, silky banana‑infused filling, and a light, airy whipped topping that all come together without ever being heated. The natural sweetness of ripe bananas means you need only a touch of sugar, keeping the dessert light yet satisfying.
Banana lovers, pie enthusiasts, and anyone who enjoys a quick, elegant breakfast will adore these cups. They’re ideal for family gatherings, potluck brunches, or a simple treat to brighten a solitary Saturday morning.
The process is straightforward: crush the crust, whip the filling, assemble the layers, and chill. In under half an hour you’ll have a beautiful, ready‑to‑enjoy dessert that looks as impressive as it tastes.
Why You'll Love This Recipe
Zero‑Bake Simplicity: No oven means less cleanup and faster prep, perfect for a relaxed brunch or a last‑minute gathering.
Portion‑Perfect Cups: Individual servings keep the presentation tidy and make it easy for guests to grab a cup without cutting a pie.
Fresh Banana Flavor: Ripe bananas provide natural sweetness and a smooth texture, reducing the need for extra sugars.
Customizable Toppings: From chocolate shavings to toasted coconut, you can tailor each cup to suit any palate.
Ingredients
The foundation of these cups is a buttery graham‑cracker crust that offers a subtle crunch, while the filling combines cream cheese, heavy cream, and ripe bananas for a silky, tangy base. A light whipped topping adds airy lift, and optional garnishes like chocolate or toasted nuts bring extra texture and visual appeal.
Crust
- 1 ½ cups graham‑cracker crumbs
- 3 tablespoons unsalted butter, melted
- 1 tablespoon granulated sugar
Filling
- 8 ounces cream cheese, softened
- ¼ cup powdered sugar
- 1 teaspoon pure vanilla extract
- ½ cup heavy cream, chilled
- 2 ripe bananas, mashed
Topping & Garnish
- ½ cup whipped topping (store‑bought or homemade)
- 2 tablespoons chocolate shavings (optional)
- 1 tablespoon toasted coconut flakes (optional)
These ingredients work together to create a dessert that’s both comforting and sophisticated. The butter‑infused crust holds the cup together, while the cream‑cheese base adds richness without overwhelming the delicate banana flavor. Heavy cream lightens the mixture, giving it a mousse‑like texture, and the optional toppings let you finish each cup with a touch of elegance.
Step-by-Step Instructions
Preparing the Crust
In a medium bowl combine graham‑cracker crumbs, melted butter, and granulated sugar. Stir until the mixture resembles wet sand. Spoon an even tablespoon into the bottom of each serving cup (8‑oz ramekins or clear glasses) and press firmly with the back of a spoon to create a compact base. This step is crucial for a sturdy foundation that won’t crumble when layered.
Making the Banana‑Cream Filling
- Blend the Cream Cheese. Using an electric mixer, beat softened cream cheese on medium speed until smooth, about 1 minute. This eliminates lumps that could affect the final texture.
- Incorporate Sweeteners. Add powdered sugar and vanilla extract; continue beating until fully combined and the mixture is pale.
- Whip the Cream. In a separate chilled bowl, whip heavy cream until soft peaks form. Gently fold the whipped cream into the cream‑cheese mixture, preserving the airy structure.
- Blend in Bananas. Fold in the mashed ripe bananas until just incorporated. Over‑mixing can make the filling dense; a gentle hand keeps it light.
Assembling the Cups
Spoon the banana‑cream mixture over the crust, filling each cup about three‑quarters full. Smooth the tops with the back of a spoon. Then, dollop a generous spoonful of whipped topping on each cup. If you like extra texture, sprinkle chocolate shavings or toasted coconut flakes on the whipped layer.
Chilling
Cover the assembled cups with plastic wrap and refrigerate for at least 45 minutes, or up to 4 hours. Chilling allows the crust to set and the flavors to meld, resulting in a firm yet creamy bite. When ready to serve, remove the wrap, add a final garnish if desired, and enjoy immediately.
Tips & Tricks
Perfecting the Recipe
Use Fully Ripe Bananas: Over‑ripe bananas give natural sweetness and a smoother texture, reducing the need for extra sugar.
Chill the Bowl & Whisk: A cold bowl helps heavy cream reach stiff peaks faster, creating a lighter filling.
Press Crust Firmly: Compact the crumb base with the back of a spoon or the bottom of a glass to prevent it from crumbling when served.
Don’t Over‑Fold: When incorporating whipped cream and bananas, fold just until combined to keep the mixture airy.
Flavor Enhancements
Add a splash of dark rum or amaretto to the banana mixture for an adult‑friendly twist. A pinch of cinnamon or nutmeg can also deepen the flavor profile without overpowering the banana.
Common Mistakes to Avoid
Avoid using cold bananas straight from the fridge—they’ll be harder to mash and can create lumps. Also, don’t skip the chilling step; serving the cups too soon results in a soggy crust and a runny filling.
Pro Tips
Layer Strategically: Place the crust first, then a thin layer of banana‑cream, a second thin crust, and finish with the remaining cream for a mini‑layered pie effect.
Use a Food Processor: For an ultra‑smooth filling, pulse the bananas with the cream‑cheese mixture briefly in a food processor.
Garnish Right Before Serving: Add fresh fruit or chocolate shavings just before plating to keep textures distinct.
Store in Clear Cups: Transparent glasses showcase the beautiful layers, making the dish as visually appealing as it is tasty.
Variations
Ingredient Swaps
Replace graham‑cracker crumbs with vanilla wafer or almond cookie crumbs for a different flavor base. For a dairy‑free version, swap cream cheese with a vegan cream cheese alternative and use coconut‑whipped topping. Fresh berries can substitute banana for a tangier twist.
Dietary Adjustments
To make the cups gluten‑free, ensure the crumbs are certified gluten‑free. For a lower‑calorie option, use low‑fat cream cheese and a sugar‑free whipped topping. Keto diners can replace powdered sugar with erythritol and use almond‑flour crumbs for the crust.
Serving Suggestions
Serve these cups alongside a bright citrus fruit salad or a glass of chilled chai latte for a balanced brunch. For a festive touch, drizzle caramel sauce over each cup just before serving, or pair with a crisp mimosa for a weekend celebration.
Storage Info
Leftover Storage
Allow any leftovers to cool completely, then cover each cup with plastic wrap and place them in an airtight container. Store in the refrigerator for up to 3 days. For longer keeping, freeze the cups (without the whipped topping) in freezer‑safe containers for up to 2 months; add fresh topping after thawing.
Reheating Instructions
Since the dish is no‑bake, reheating is optional. If you prefer a slightly softer crust, let the cup sit at room temperature for 10 minutes before serving. For a warm version, microwave the cup for 15‑20 seconds, then top with fresh whipped cream to restore the original texture.
Frequently Asked Questions
This No‑Bake Banana Cream Pie Cup brings together buttery crust, silky banana‑cream filling, and airy topping in a convenient, handheld format. By following the step‑by‑step guide, using fresh ingredients, and applying the pro tips, you’ll achieve a dessert that’s both elegant and effortless. Feel free to experiment with toppings or flavor twists—cooking is your canvas. Enjoy every creamy, banana‑kissed bite! (84 words)