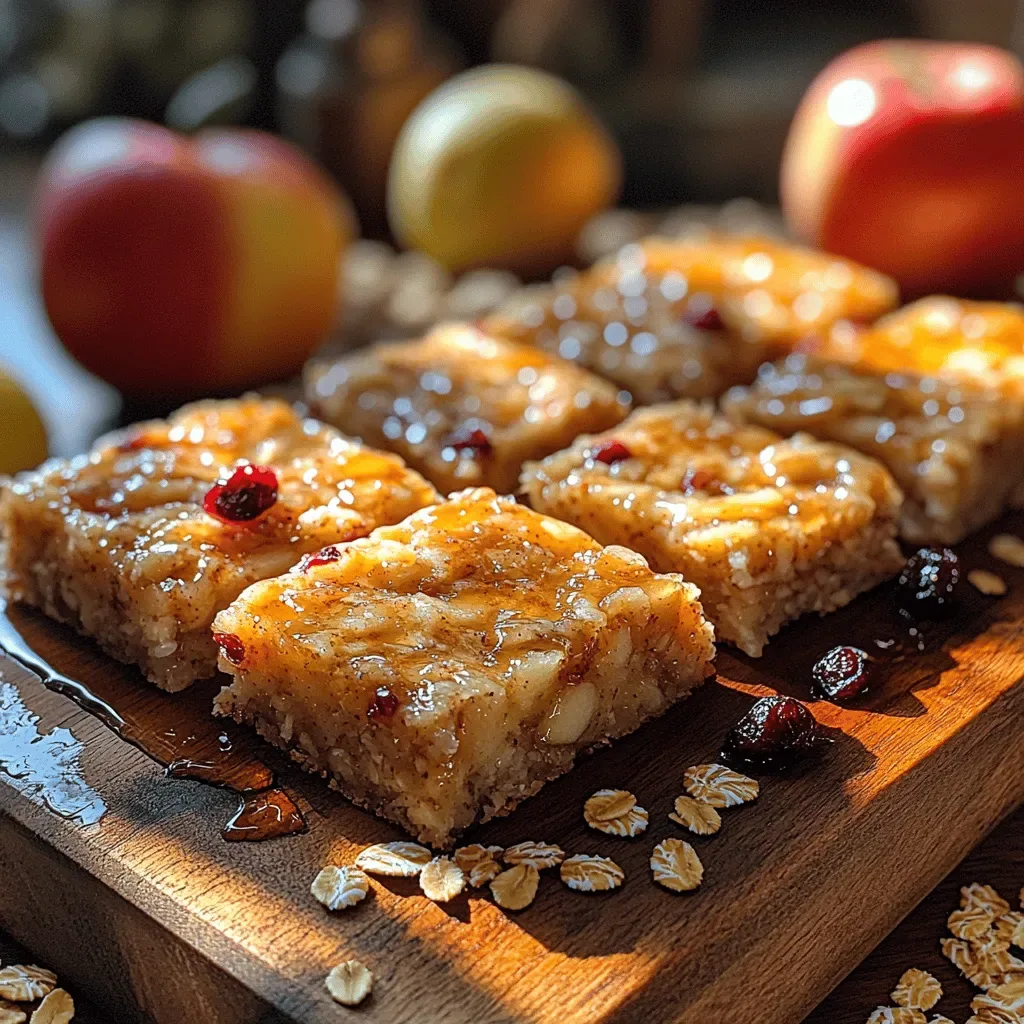
Imagine a bite‑size treat that’s cool, chewy, and bursting with the comforting flavors of classic oatmeal cookie dough—without any of the raw‑egg worries. That’s exactly what Chill & Chewy Frozen Oatmeal Cookie Dough Chunks deliver, making every snack feel like a mini celebration.
What sets this recipe apart is the perfect balance of oat‑rich texture, a hint of brown‑sugar caramel, and a subtle dash of vanilla, all locked in a freezer‑friendly chunk that stays delightfully soft after thawing.
Kids, college students, and anyone craving a quick, no‑bake dessert will love these chunks. They’re ideal for after‑school snacks, late‑night cravings, or as a sweet addition to a brunch spread.
The process is straightforward: mix a simple dough, shape it into bite‑sized squares, flash‑freeze, then coat each piece in a light glaze. In under half an hour you’ll have a freezer‑ready stash that lasts for weeks.
Why You'll Love This Recipe
Cold‑Comfort Sweetness: The chilled texture adds a refreshing twist to the familiar oatmeal‑cookie flavor, making it perfect for warm weather or a post‑workout treat.
Minimal Ingredients: You only need pantry staples—oats, brown sugar, butter, and a splash of vanilla—so it’s budget‑friendly and easy to whip up.
Freezer‑Friendly: Once frozen, the chunks stay fresh for up to three months, giving you a ready‑made dessert whenever the craving hits.
Customizable Add‑Ins: Toss in chocolate chips, dried fruit, or a pinch of sea salt for endless flavor variations without extra hassle.
Ingredients
The foundation of these frozen cookie‑dough chunks is a simple oat‑based batter that mimics the classic cookie dough texture without raw eggs. Sweetness comes from brown sugar and a splash of maple‑gold honey, while butter provides richness and helps the dough stay pliable after freezing. Optional mix‑ins like chocolate chips or dried cranberries add bursts of flavor and visual appeal.
Dry Ingredients
- 1 ½ cups rolled oats
- ¾ cup all‑purpose flour
- ½ cup packed light brown sugar
- ¼ teaspoon baking soda
Wet Ingredients
- ⅓ cup unsalted butter, melted
- 2 tablespoons pure maple‑gold honey
- 1 teaspoon pure vanilla extract
Add‑Ins & Finishing Touches
- ½ cup semi‑sweet chocolate chips (optional)
- 2 tablespoons chopped toasted walnuts (optional)
- Pinch of flaky sea salt for garnish
The rolled oats give a hearty chew, while the flour creates a tender crumb. Brown sugar adds a caramel‑like depth, and the melted butter binds everything together, ensuring the chunks stay soft after freezing. The honey and vanilla round out the flavor profile, delivering a subtle sweetness that complements any optional add‑ins you choose to incorporate.
Step-by-Step Instructions
Mixing the Dry Base
Begin by whisking together the rolled oats, flour, brown sugar, and baking soda in a large mixing bowl. This ensures the leavening agent is evenly distributed, preventing any pockets of soda that could create an unwanted metallic taste. The dry blend should look uniform and slightly crumbly before the wet ingredients join.
Incorporating the Wet Ingredients
In a separate bowl, combine the melted butter, maple‑gold honey, and vanilla extract. Stir until the mixture is smooth and glossy. Pour the wet blend over the dry ingredients, then use a rubber spatula to fold everything together. The dough should come together in a thick, slightly sticky mass that holds together when pressed.
Adding Optional Mix‑Ins
If you’re using chocolate chips, walnuts, or dried fruit, fold them in now. Distribute evenly so every bite gets a surprise of texture. This step is optional, but it adds visual interest and extra flavor layers that make the chunks more indulgent.
Shaping and Freezing
- Portion the dough. Using a tablespoon or small ice‑cream scoop, portion the dough onto a parchment‑lined baking sheet. Press each mound into a flat square about 1‑inch thick. Uniform size ensures even freezing and later thawing.
- Flash‑freeze. Place the sheet in the freezer for 20‑25 minutes, or until the chunks are firm to the touch. This rapid chill prevents them from sticking together when transferred to storage.
- Bag and label. Transfer the frozen squares into a zip‑top freezer bag, arranging them in a single layer. Squeeze out excess air, seal, and label with the date. The chunks will keep for up to three months.
- Optional glaze. For a glossy finish, melt 2 tablespoons of butter with 1 tablespoon of honey, brush lightly over each frozen chunk before sealing. The glaze adds a subtle shine and extra sweetness that shines when served.
Serving the Chunks
When you’re ready to enjoy, simply remove a few chunks from the freezer and let them sit at room temperature for 5‑7 minutes. This short softening period brings out the chewy texture while keeping the interior cool. Serve as is, or drizzle with a spoonful of warm milk or a scoop of vanilla ice cream for an extra‑indulgent treat.
Tips & Tricks
Perfecting the Recipe
Measure oats accurately. Use a kitchen scale or level the measuring cup; too many oats can make the dough crumbly.
Don’t over‑mix. Once the wet and dry components combine, stop stirring. Over‑mixing develops gluten, leading to a tougher bite.
Cool butter slightly. Butter should be warm enough to melt but not hot; this prevents the dough from becoming greasy.
Freeze on parchment. This avoids sticking and makes transferring to storage bags a breeze.
Flavor Enhancements
Sprinkle a pinch of sea salt on each chunk before sealing for a sweet‑salty contrast. Add a dash of cinnamon or pumpkin spice to the dry mix for a warm, autumnal twist. For extra richness, swirl a teaspoon of melted dark chocolate through the dough before portioning.
Common Mistakes to Avoid
Avoid using melted butter that’s too hot; it can cook the oats and change the texture. Also, don’t skip the flash‑freeze step—without it, the chunks will cling together, making portioning difficult and ruining the chewiness.
Pro Tips
Use a kitchen scale. Weighing oats and butter yields consistent results batch after batch.
Layer flavors. Toast the oats lightly before mixing for a nutty depth that shines through the final bite.
Portion with a scoop. A small ice‑cream scoop guarantees uniform size, which helps with even freezing and consistent serving portions.
Serve with a dip. A quick dip of warm caramel sauce or a dollop of Greek yogurt adds a creamy contrast that elevates the snack.
Variations
Ingredient Swaps
Replace rolled oats with quick‑cooking oats for a softer texture, or swap the butter for coconut oil for a subtle tropical note. For a richer chocolate experience, use cocoa powder in place of ¼ cup flour and double the chocolate chips.
Dietary Adjustments
For a gluten‑free version, substitute all‑purpose flour with a 1‑to‑1 gluten‑free blend and ensure the oats are certified gluten‑free. Vegan eaters can swap butter for a plant‑based margarine and use maple syrup instead of honey. Keto fans can replace flour with almond flour and use erythritol in place of brown sugar.
Serving Suggestions
Pair the chunks with a scoop of vanilla bean ice cream for an indulgent sundae, or drizzle them over warm oatmeal for a breakfast‑dessert hybrid. They also make a fun addition to a charcuterie board alongside fresh fruit, nuts, and a drizzle of dark chocolate.
Storage Info
Leftover Storage
Allow the chunks to cool completely, then transfer them to an airtight freezer‑safe bag or container. Store in the freezer for up to 3 months. For short‑term use, keep a portion in the refrigerator for up to 5 days; this keeps them soft and ready to eat without thawing.
Reheating Instructions
To enjoy a warm version, place frozen chunks on a parchment sheet and bake at 350°F (175°C) for 6‑8 minutes, just until the glaze softens. Alternatively, microwave a single chunk on medium power for 15‑20 seconds, then let stand for a few seconds before eating.
Frequently Asked Questions
This Chill & Chewy Frozen Oatmeal Cookie Dough Chunk recipe gives you a versatile, make‑ahead dessert that stays soft, flavorful, and perfectly portioned. By following the detailed steps, using the suggested tips, and experimenting with the variations, you’ll create a snack that satisfies any sweet tooth. Feel free to swap mix‑ins, adjust for dietary needs, and get creative with toppings. Enjoy every chilled, chewy bite—your freezer just became a dessert powerhouse!