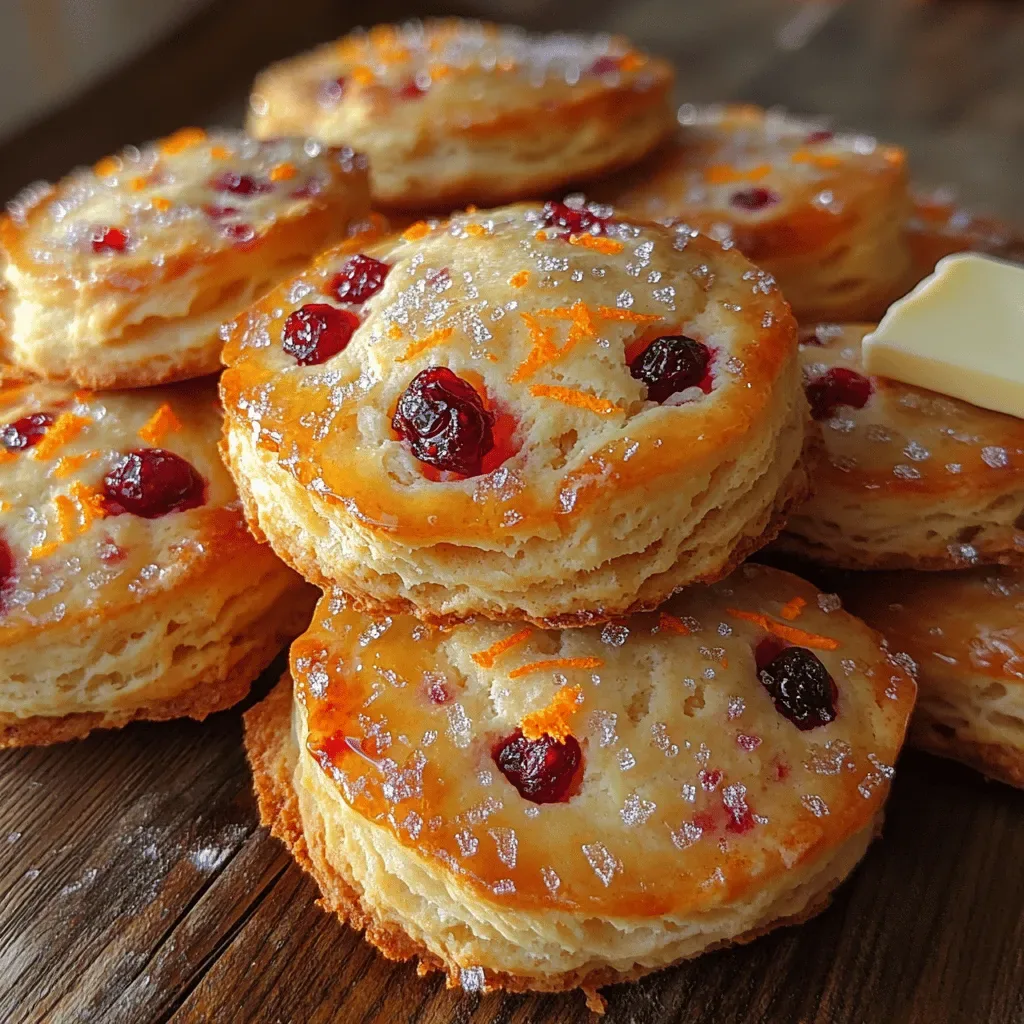
Imagine biting into a tender, buttery scone that bursts with the bright zing of orange and the tart pop of cranberry. That first bite is a celebration of flavor, texture, and color all in one handheld delight.
What makes these scones special is the perfect balance between sweet and tangy, achieved by folding fresh orange zest and juice into a classic buttermilk dough, then scattering dried cranberries throughout. The result is a moist crumb dotted with jewel‑like bursts of fruit.
These bright orange cranberry scones will win over anyone who loves a festive breakfast—whether it’s a lazy weekend brunch, a holiday gathering, or a quick weekday treat with coffee. Their eye‑catching hue also makes them a centerpiece for any occasion.
From mixing the dry ingredients to the final glaze, the process is straightforward: combine, fold, shape, bake, and glaze. A few simple steps yield bakery‑quality scones that you can proudly serve fresh from the oven.
Why You'll Love This Recipe
Vibrant Flavor Pairing: The citrusy orange lifts the sweet dough while cranberries add a tart pop, creating a harmonious contrast that awakens the palate.
Simple Technique: No fancy equipment or advanced pastry skills are needed—just a bowl, a whisk, and a love for good baking.
Show‑Stopping Presentation: The radiant orange hue and speckled cranberries make these scones as beautiful as they are tasty, perfect for Instagram or a holiday spread.
Versatile Serving: Enjoy them warm with butter, drizzle with a glaze, or split and top with cream cheese for an extra indulgent twist.
Ingredients
For these scones, fresh citrus and dried fruit are the stars. The buttermilk creates a tender crumb, while the butter adds richness. Orange zest and juice provide a bright aroma, and cranberries give a burst of tartness. A light glaze finishes the scones with a glossy, sweet‑tangy sheen that makes them irresistible.
Dry Ingredients
- 2 ½ cups all‑purpose flour
- ¼ cup granulated sugar
- 2 teaspoons baking powder
- ½ teaspoon baking soda
- ¼ teaspoon salt
Wet Ingredients
- ¾ cup cold buttermilk
- ¼ cup unsalted butter, cubed and chilled
- Zest of one large orange (about 2 tablespoons)
- 2 tablespoons fresh orange juice
Add‑ins & Glaze
- ¾ cup dried cranberries
- 1 egg, lightly beaten (for egg wash)
- 2 tablespoons powdered sugar (for glaze)
- 1 tablespoon orange juice (for glaze)
The flour provides structure, while the leaveners give the scones a light lift. Sugar balances the tart cranberries, and the butter, cut in cold, creates flaky layers. Buttermilk reacts with baking soda to produce a tender crumb, and the orange zest infuses every bite with citrus aroma. The glaze adds a glossy finish and an extra burst of orange flavor that makes the scones look as good as they taste.
Step-by-Step Instructions
Preparing the Dry Mix
In a large bowl whisk together the flour, sugar, baking powder, baking soda, and salt. This ensures the leavening agents are evenly distributed, preventing pockets of bitterness. The dry mixture should look uniform before any wet ingredients are added.
Incorporating the Butter
Add the chilled butter cubes to the dry ingredients. Using a pastry cutter or your fingertips, rub the butter into the flour until the mixture resembles coarse crumbs with pea‑size pieces of butter still visible. This step creates the flaky texture that defines a great scone.
Adding Cranberries & Orange
Stir in the dried cranberries, orange zest, and orange juice. The juice adds moisture, while the zest distributes aromatic oils throughout the dough. Mix just until combined; over‑mixing will develop gluten and make the scones tough.
Shaping & Baking
- Form the dough. Pour the cold buttermilk over the mixture and gently stir with a wooden spoon until a sticky dough forms. The dough should be just combined—visible streaks of flour are okay.
- Turn onto a surface. Lightly flour a clean work surface and turn the dough out. Pat it into a 1‑inch thick circle without over‑working.
- Cut the scones. Using a floured 2‑inch round cutter, press down firmly and lift the scones. Gather the scraps, reshape, and cut again until all dough is used.
- Egg wash. Brush the tops with the beaten egg; this creates a golden, glossy finish after baking.
- Bake. Place scones on a parchment‑lined baking sheet and bake in a preheated 425°F oven for 18‑22 minutes, or until the tops are deep golden and a toothpick comes out clean.
Finishing the Glaze
While the scones cool on a rack, whisk together powdered sugar and orange juice until smooth. Drizzle the glaze over the warm scones; the heat will melt the glaze slightly, giving each piece a shiny, sweet‑tangy coat that highlights the orange‑cranberry specks.
Tips & Tricks
Perfecting the Recipe
Cold ingredients are key. Keep butter and buttermilk chilled until the moment you mix them. Cold fat creates steam during baking, which forms the flaky layers.
Handle the dough gently. Over‑mixing develops gluten, leading to dense scones. Stop stirring as soon as the dough comes together.
Use a hot oven. Baking at 425°F gives the scones an immediate lift and a beautifully browned crust.
Rest before cutting. Allow the dough to sit for 5 minutes after shaping; this relaxes the gluten and makes cutting cleaner.
Flavor Enhancements
Add a pinch of ground ginger or cardamom to the dry mix for warm spice notes. A splash of almond extract in the glaze adds depth, while a sprinkle of toasted almond slivers on top adds crunch and visual appeal.
Common Mistakes to Avoid
Don’t let the dough sit too long before baking; the leavening agents lose potency and the scones won’t rise. Also, avoid using too much flour when dusting the surface, which can dry out the dough and produce a heavy texture.
Pro Tips
Brush with melted butter. After the egg wash, lightly brush the tops with melted butter for extra richness and a deeper golden hue.
Use parchment paper. Lining the baking sheet prevents sticking and makes cleanup effortless while preserving the scones’ delicate crust.
Test for doneness. The scones should feel firm to the touch and the interior should be a pale, fluffy crumb; a quick tap on the bottom should sound hollow.
Serve immediately. Scones are at their peak texture when fresh from the oven; if you must wait, store them loosely covered to retain moisture.
Variations
Ingredient Swaps
Replace dried cranberries with chopped dried apricots or golden raisins for a sweeter profile. Swap orange zest for lemon or lime for a different citrus twist. For a nutty crunch, fold in ¼ cup toasted pistachios or slivered almonds.
Dietary Adjustments
Use a gluten‑free flour blend (ensure it contains xanthan gum) to keep the structure. Substitute butter with cold coconut oil for dairy‑free scones. For a low‑sugar version, halve the granulated sugar and use a sugar‑free powdered sweetener in the glaze.
Serving Suggestions
Pair these scones with a dollop of vanilla Greek yogurt or a smear of orange‑infused cream cheese. A drizzle of honey or maple syrup adds extra sweetness, while a side of fresh fruit salad balances the tangy notes.
Storage Info
Leftover Storage
Allow the scones to cool completely, then place them in an airtight container or a zip‑top bag. Store at room temperature for up to two days, or refrigerate for up to four days. For longer keeping, freeze individually wrapped scones for up to three months.
Reheating Instructions
Reheat frozen or refrigerated scones in a 350°F oven for 8‑10 minutes, or until warmed through and the glaze softens. A quick microwave (15‑20 seconds) works in a pinch, but the oven preserves the flaky texture best.
Frequently Asked Questions
This Bright Orange Cranberry Scone recipe delivers a stunning visual and a perfectly balanced flavor profile with minimal effort. We’ve covered everything from ingredient selection to storage, plus plenty of variations to suit any diet or palate. Feel free to experiment with citrus, dried fruit, or glazes—baking is your playground. Serve warm, share generously, and enjoy every flaky, citrus‑kissed bite!